I have been challenged to create one set of Masculine Cards and one set of Feminine Cards using at least three techniques I learned from the AECP Level 1 Courses.
Herewith my 4 Masculine Cards:

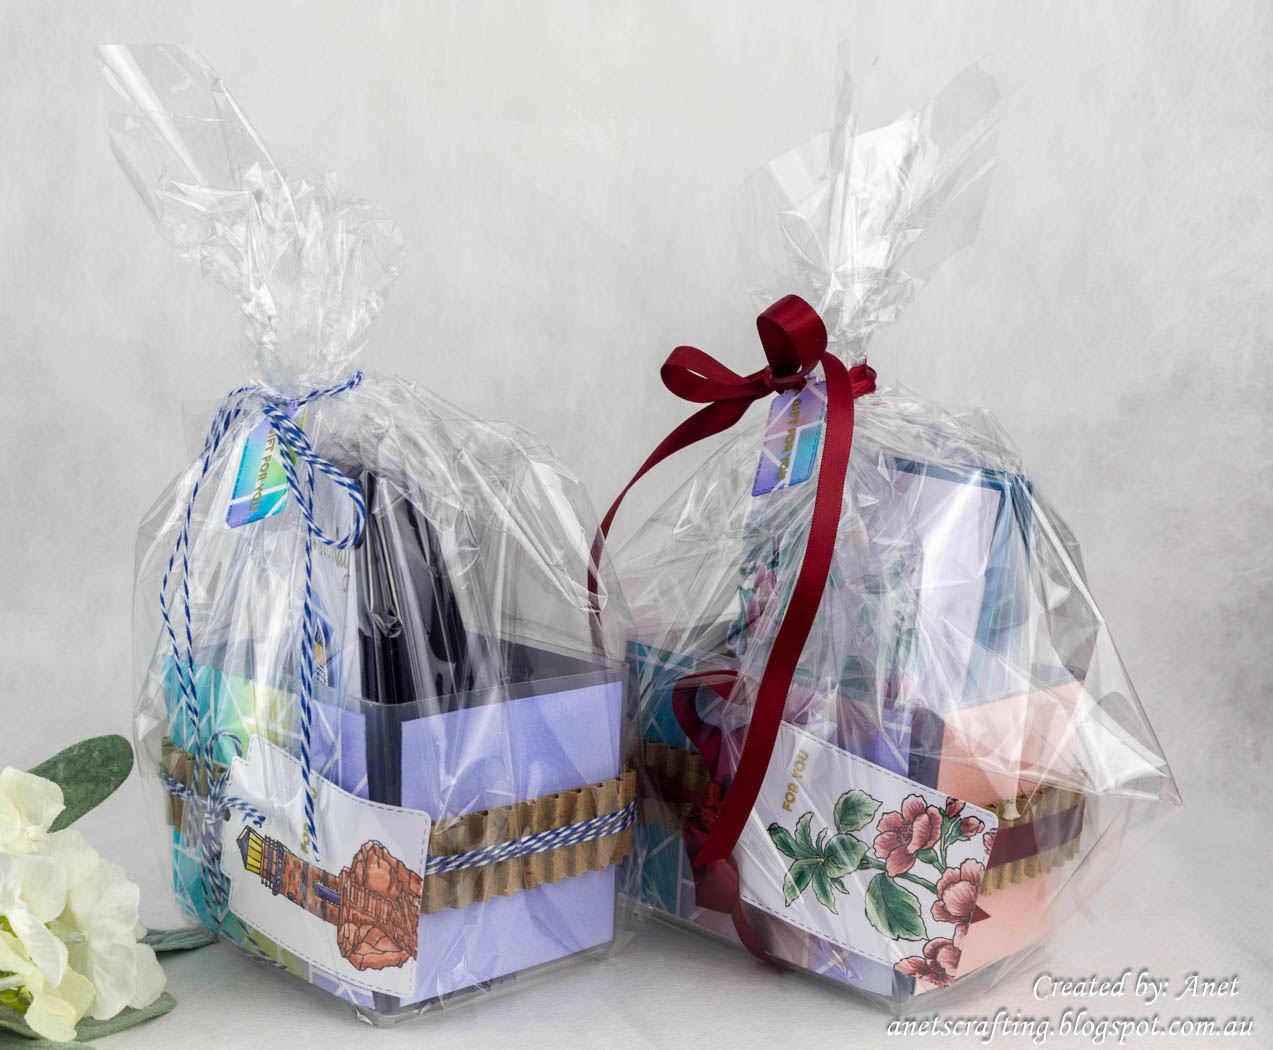
I am also asked to design how I package the masculine and feminine sets as a gift and also use a recycled item. I decided to use the recycled items on the packaging for each card set and I will explain how I did this in the latter part of my post and video.

The AECP Level 1 Techniques I used:
1. Easy Die Cutting Techniques
From this class I learned to connect other techniques to what I already knew about die cutting and take it to another level to achieve texture.
2. Celebration Stencil Techniques
This class was so helpful by learning how to use the Altenew Simple Shapes Cover Die with different stencil techniques to create backgrounds.
3. Easy Ink Blending Techniques
The class provided a framework how to achieve great ink blending results for my project backgrounds.
To achieve a cohesive theme I used all the above techniques in various ways to create 4 Masculine Cards, concentrating on the following colour inspiration and using the Altenew Seas The Day Sentiment Stamp & Die and Simple Shapes Cover Die through out the set.


First I create my own stencils by die-cutting with the Altenew Simple Shapes Cover Die and circle die.
Tip: Use thicker cardstock when creating your own stencil so that you can get multiple uses out of it.

Following on from this I used the Ombre Technique with the stencil die-cut and the Altenew Blue Mountains Alpine Aster Fresh Dye Ink, Sweet Dreams Teal Cave and Summer Afternoon Warm Sunshine Crisp Dye Ink. Just love the blended texture background I achieved for the focal image.

I then stamped the Altenew Seas The Day Lighthouse Stamp onto blending cardstock, coloured it with the Altenew Artist Markers Mystic Garden Set J and Artist Markers Rock Garden Set D. I die-cut it with the Altenew Seas The Day Lighthouse Die and added onto the card front using 3D foam dots.

To finish I stamped the Altenew Seas The Day Sentiment Stamp, heat emboss it and layered it onto the navy card base using foam tape.
Card 2 - Life

I wanted to create a background that represent the rhythmically flash or light eclipse from the lighthouse.
First I create my own stencils by die-cutting the Altenew Simple Shapes Cover Die, die-cut a piece of white cardstock with a few circle dies and used a square die to die-cut a strip.

Following on from this I used the Bokeh Technique with the stencil die-cut and the Altenew Blue Mountains Water Hyacinth Fresh Dye Ink, Sweet Dreams Dew Drops and Summer Afternoon Warm Sunshine Crisp Dye Ink. The bokeh technique just soften the beautiful texture background.
Tip: Choose two or three different colours that work well together for the Bokeh Technique. Light or subtle colours work the best.

I then stamped the Altenew Seas The Day Lighthouse Stamp and water coloured it with the Altenew Hawaiian Shores Duel Tip Pens, Summer Afternoon Caramel Toffee and Summer Afternoon Paper Bag Crisp Dye Ink. I die-cut it with the Altenew Seas The Day Lighthouse Die and added onto the card front using 3D foam dots.
Tip: Use Watercolour Paper and Versafine Ink when water colouring a focal image.

To finish I stamped the Altenew Seas The Day Sentiment Stamp, heat emboss it and layered it onto the navy card base using foam tape.
Card 3 - Happy Birthday

My next background inspiration came from a photo where the light from the lighthouse reflects onto the sea at night time.
First I die-cut two strips with a landscape die to achieve a wave effect.

Following on from this I mixed Altenew Blue Mountain Indigo Skies, Woodland Escape Fresh Dye Ink and Sweet Dreams Teal Cave Crisp Dye Ink with Embossing Paste and used it through the Altenew Simple Shapes Cover Die stencil die-cut. Just love the beautiful texture I achieved for the background.
Tip: Tint your embossing paste with Altenew Inks. Create your own custom colours by combining a few inks together.

I then placed foil on top of the wet embossing paste. After it dried I peeled the foil off and achieved a beautiful foiled light reflection.
Tip: When working with embossing paste, clean your stencils and tools right away. Do not allow it to dry, because it will be very difficult to clean.

Following on from this I stamped the Altenew Seas The Day Lighthouse Stamp and water coloured it with the Altenew Blue Mountain Fresh Dye Ink.
To add some gold effect onto the lighthouse I used a embossing pen and heat emboss it using gold embossing powder. I die-cut it with the Altenew Seas The Day Lighthouse Die and adhere it onto the card front using 3D foam dots.

To finish I stamped a sentiment, heat emboss it and layered it onto the navy card base using foam tape.
Card 4 - Bon Voyage

First I trimmed white cardstock three times and gold cardstock once to 2" x 3". I then die-cut the first white cardstock and gold cardstock with the Altenew Simple Shapes Cover Die.
Following on from this I ink blend the other two white cardstocks with the Altenew Blue Mountain Alpine Aster Fresh Dye Ink and Sweet Dreams Aqualicious Crispy Dye Ink.
Tip: When ink blending, work in circular motions to avoid harsh lines.

I then die-cut the blended cardstocks with the Altenew Simple Shapes Cover Die. I kept all the coloured shapes that I removed from the die-cuts.
Following on from this I die-cut navy cardstock with two rectangle dies and adhere it onto the card front using 3D foam tape. I adhered the white cover die-cut onto the middle rectangle and added the coloured shape die-cuts.

Following on from this I stamped the Altenew Seas The Day Lighthouse Stamp and coloured it with the Altenew Artist Markers Mystic Garden Set J and Artist Markers Rock Garden Set D. I die-cut it with the Altenew Seas The Day Lighthouse Die and adhere it onto the card front using 3D foam dots.
I then stamped the Altenew Seas The Day Sentiment Stamp onto navy cardstock, heat emboss it and adhered it onto the card front using 3D foam dots.

To finish I layered it onto the navy card base using foam tape.
Masculine Gift Package
This is where I incorporated my recycle elements. I used an ear bud plastic container and cardboard from a box that my furry children's pet supplies were shipped in.


First I create my own stencil by die-cutting the Altenew Simple Shapes Cover Die. I trimmed white cardstock to 3" x 3 7/8".

I then used the Ombre Technique with the stencil die-cut and the Altenew Blue Mountain Indigo Skies Fresh Dye Ink, Sweet Dreams Galactic Stream and Summer Afternoon Warm Sunshine Crisp Dye Ink. I adhered it onto the container using foam tape.

Following on from this I trimmed white cardstock once to 3" x 3 7/8" and twice to 2 7/8" x 3". I ink blend it with the Altenew Blue Mountain Alphine Aster Fresh Dye Ink and adhered it onto the container using double sided tape.

I then trimmed a strip of the cardboard to 1" and added it around the plastic container using double sided tape.

Following on from this I die-cut white cardstock with a Tag Die. I stamped the Altenew Seas The Day Lighthouse Stamp and water coloured it with the Altenew Blue Mountain Indigo Skies Fresh Dye Ink and Summer Afternoon Warm Sunshine and Paper Bag Crisp Dye Ink.

I then stamped a sentiment, heat emboss it, punched a hole and adhered it onto the cardboard sleeve using twine.

To finish I die-cut white cardstock with a Tag Die. I used the Bokeh Technique with the Altenew Simple Shapes Cover Die stencil die-cut and the Altenew Blue Mountains Indigo Skies Fresh Dye Ink, Summer Afternoon Warm Sunshine and Sweet Dreams Teal Cave Crisp Dye Ink. I punched a hole, wrap the container with Cellophane, tied it with twine and the tag attached.
Video Tutorial
Be sure to check out my Video Tutorial below to learn how to create the Masculine and Feminine Gift Packages.
Also do not forget to check out my Feminine Gift Card Set.
I will share more of my projects from the AECP as I work my way through the courses so stay tuned for more cardmaking posts!
If you like what you have seen from me, please give a follow over or subscribe to my Blog and Youtube if you have not already:
My Personal blog here:
My YouTube here:
My Facebook here:
https://www.facebook.com/AnetVanZyl/
Thank you for visiting me and I hope you enjoyed how I created my Masculine Gift Card Set. This was such a fun and learning experience! I always appreciate you taking the time to leave a lovely comment.
Anet x
I would like to enter the following challenges:
Pearly Sparkles Challenge Blog. Theme: Anything But A Card.
Morgan's ArtWorld Challenge Blog. Theme: Anything Goes.
Worldwide Crafters and Colorists Challenge Blog. Theme: Anything Goes.
Mix It Up Challenge Blog. Theme: Anything Goes.
Craft Rocket Challenge Blog. Theme: For The Boys.
Aud Sentiments Challenge Blog. Theme: Watercoloring & Sentiment.
Sweet Stampin Challenge Blog. Theme: Masculine.
Passion For Markers Challenge Blog. Theme: Add a Sentiment.
Make My Monday Challenge Blog. Theme: Clean and Simple Base + 1 Layer
Dream Valley Challenge Blog. Theme: Make It Sparkle.
Just in case you want to do a little shopping I have added the links below (they are affiliate links which means that I will receive a small portion of the sale at no extra cost to you). I truly appreciate your support of my card adventures!
Material list:


Anet, this set is marvelous!!! You did a TERRIFIC job!! I love this set and it's packaging! Well done!
ReplyDeleteWow, such a beautiful set of cards, love that they're all different and in such gorgeous ocean colors for that pretty lighthouse! What a great gift! Thanks so much for playing at Make My Monday!
ReplyDeleteAn absolutely stunning set of masculine cards and so beautifully presented too! Love your stencilling technique and your colouring of the stamped images is perfect too! Thanks so much for joining in with my challenge this week st Passion for Markers. Hugs, Karen x
ReplyDeleteFabulous masculine cards with great stencilling. Thanks for playing along with us at Sweet Stampin. Pat K x
ReplyDeleteThese are wonderful - I really enjoyed watching your journey to create this set. I would love to receive a set like this as a gift!
ReplyDeleteThank you for sharing your card in our challenge at Dream Valley.
Sharon – Dream Valley Challenge Designer
http://glittertastic.blogspot.com/ - Stop by and see me!!!
Great cards and beautiful packaging Anet! Thank you for sharing with us over here at Pearly Sparkles Challenge and best of luck with your entry. Love to see you join in each month. Thank you.
ReplyDeleteGale DT for
http://pearlysparkleschallenge.blogspot.com/
What a beautiful gift set of cards. You created so much depth with your stencils. Gorgeous! Thanks for joining us at Make My Monday! I hope to see you in the gallery again, soon! Sue - DT
ReplyDeleteWow Anet what a wonderful gift set of cards. I love the colours you've used and your colouring of the images is perfect. Great layouts and your packaging is amazing. Thanks for sharing with us at Passion for Markers this week. Hugs, Denise x
ReplyDeleteWonderful idea for a gift.
ReplyDelete