Hi Everyone,
Anet here today and welcome to my inspiration post.
Anet here today and welcome to my inspiration post.
from Couture Creations.


Step by step instructions:
1. Fold two square blank cards in the middle.
Fold the first blank card into half on the left side and
add double sided tape on the unfolded side (U shape).
Tip: the top must remain open to insert the tag.


Stick the unfolded sides onto each other.


2. Cut Precious Cardstock four times to 6.2cm x 12.9cm
and My Secret Love Pattern Paper four times to 5.6cm x 12.3cm.
Stick onto each other and adhere onto card base.


3. Cut Precious Cardstock to 12.9cm x 12.9cm and
My Secret Love Pattern Paper to 12.3cm x 12.3cm.
Stamp My Secret Love Sentiment onto pattern paper and heat emboss.
Stick onto each other and adhere onto the inside of the card.


4. Band
Cut Precious Cardstock to 5cm x 28.5cm,
score at 8cm and 22cm and fold.
Add double sided tape and stick ends onto each other.

Cut My Secret Love Pattern Paper to 4.4cm x 13.3cm
and adhere onto cardstock band.

5. Stamp white cardstock with
My Secret Love Butterfly Cage Stamp and heat emboss.
Die-cut with Modern Essentials Oval Frame Cut, Foil and Emboss Die.

Die-cut Precious Cardstock with
Modern Essentials Oval Frame Cut, Foil and Emboss Die.

6. Stick onto each other using 3D foam dots
and adhere onto band.
and My Secret Love Pattern Paper four times to 5.6cm x 12.3cm.
Stick onto each other and adhere onto card base.


My Secret Love Pattern Paper to 12.3cm x 12.3cm.
Stamp My Secret Love Sentiment onto pattern paper and heat emboss.
Stick onto each other and adhere onto the inside of the card.


Cut Precious Cardstock to 5cm x 28.5cm,
score at 8cm and 22cm and fold.
Add double sided tape and stick ends onto each other.

and adhere onto cardstock band.

5. Stamp white cardstock with
My Secret Love Butterfly Cage Stamp and heat emboss.
Die-cut with Modern Essentials Oval Frame Cut, Foil and Emboss Die.

Die-cut Precious Cardstock with
Modern Essentials Oval Frame Cut, Foil and Emboss Die.

6. Stick onto each other using 3D foam dots
and adhere onto band.


7. Die-cut Caloden Cardstock with
My Secret Love Reaching Fern Cut and Create Die and
adhere onto band using 3D foam dots.


8. Use Ink Letterpress Technique with
My Secret Love Reaching Fern Cut and Create Die and
Card Deco Essentials Apple Green Pigment Ink.
Adhere onto band using 3D foam dots.


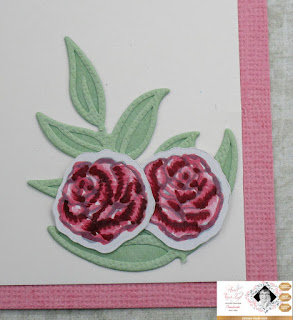
9. Stamp My Secret Love Rose Stamps onto
blending cardstock, colour and fussy-cut.
Adhere onto band, card base and
tag using 3D foam dots.


8. Die-cut Precious Cardstock with
My Secret Love Reaching Fern Cut and Create Die and
adhere onto band using 3D foam dots.


My Secret Love Reaching Fern Cut and Create Die and
Card Deco Essentials Apple Green Pigment Ink.
Adhere onto band using 3D foam dots.


blending cardstock, colour and fussy-cut.
Adhere onto band, card base and
tag using 3D foam dots.


8. Die-cut Precious Cardstock with
My Secret Love Butterflies Dies,
adhere onto card base and tag using 3D foam dots.
adhere onto card base and tag using 3D foam dots.


9. Tag
Cut Precious Cardstock to 10cm x 13cm
and white cardstock to 9cm x 12cm.
Stick onto each other.
Die-cut white cardstock with
adhere onto tag.
10. Die-cut Precious Cardstock with
My Secret Love Label Die,
add some cord and adhere onto tag.
add some cord and adhere onto tag.
Insert tag into card base opening to finish.


Here is the link to the video on how to
- Die-cut with GoPower & Emboss Machine and
- How to use GoPower & Emboss Magnetic Platform
Video Link:
Couture Creations products I have used:

C0726520 GoPower & Emboss Machine
C0727163 GoPower & Emboss Magnetic Platform
C0726752 Mini Score Board
C0724845 White Square Card

C0726520 GoPower & Emboss Machine
C0727163 GoPower & Emboss Magnetic Platform
C0726752 Mini Score Board
C0724845 White Square Card
C0727595 12 x 12 Pattern Paper - My Secret Love Double Sided Sheet 07
C0727624 My Secret Love Together Forever Sentiment Mini Stamp
C0727618 My Secret Love Butterfly Cage Mini Stamp
C0727602 My Secret Love Stamp and Die Set
C0727608 My Secret Love Secret Butterflies Die Set
C0727624 My Secret Love Together Forever Sentiment Mini Stamp
C0727618 My Secret Love Butterfly Cage Mini Stamp
C0727602 My Secret Love Stamp and Die Set
C0727608 My Secret Love Secret Butterflies Die Set
C0727611 My Secret Love Secret Labels Die Set
C0727630 My Secret Love Secret Reaching Fern Cut and Create Die
C0726460 Modern Essentials Nesting Inset Oval Frames
Cut, Foil and Emboss Die
C0725454 Le Petit Jardin Petit Floral Edge Die
ULT200077 12 x 12 Ultimate Crafts Precious Cardstock
ULT200021 12 x 12 Ultimate Crafts Caloden Cardstock
AD90017 Couture Creations Double Sided Tape 12mm
CDEIPL017 Card Deco Essentials Apple Green Pigment Ink
C0721969 Glitzin Glamour Pink
For Stockists click the link below:
https://couturecreations.com.au/pages/store-locator
I would like to enter the following challenges:
Crafty Gals Corner Challenge Blog. Theme: For The Ladies
I would like to enter the following challenges:
Crafty Gals Corner Challenge Blog. Theme: For The Ladies
Crafty Cardmakers Challenge Blog. Theme: Butterflies.
Crafts Galore Encore Challenge Blog. Theme: Anything Goes.
Crafty Sentiments Designs Challenge Blog. Theme: Anything Goes.
Simply Create Too Challenge Blog. Theme: Use Flowers.
Love To Scrap Challenge Blog. Theme: Anything Goes.
Creative Inspiration Challenge Blog. Theme: Fabulously Feminine.
Crafts Galore Encore Challenge Blog. Theme: Anything Goes.
Crafty Sentiments Designs Challenge Blog. Theme: Anything Goes.
Simply Create Too Challenge Blog. Theme: Use Flowers.
Love To Scrap Challenge Blog. Theme: Anything Goes.
Creative Inspiration Challenge Blog. Theme: Fabulously Feminine.
Crafty Creations Challenge Blog. Theme: Anything Goes.
Through The Purple Haze Challenge Blog. Theme: Anything Goes.
World Wide Open Design Team Challenge Blog. Theme: Anything Goes.
World Wide Open Design Team Challenge Blog. Theme: Anything Goes.
Thank you for visiting today and I hope you enjoyed
how I created my Z Gate Tag Fold card.
Happy Crafting!
Anet


