Wednesday 26 July 2023

Ice Skating Santa - The Paper Shelter

 Hi Everyone, are you ready ...


It is time for a new challenge at Paper Shelter
and the theme is Anything Goes

Now here is my card 
Coloured with Copic Sketch Markers.


Sentiment: Spellbinder Charming Tag Sentiments. Die: Poppystamps Stitched Landcapes. Stamp: Couture Creations Snowfall Background Stamp. Distress Oxide Blueprint Sketch and Salty Ocean. Wow Super Fine Gold Embossing Powder. Altenew Pure White Embossing Powder. 

Our Sponsor The Paper Shelter are offering one lucky winner a fabulous gift certificate of $30. But, you must use a Paper Shelter product on your card or project. This could be a Paper Shelter Image, Paper or Printable. If you don't use a Paper Shelter product, you could still win 3 digi images of your own choice. So it really is a win win situation don't you think.


Make sure you go over to The Paper Shelter Shop and take a look at all the beautiful digital stamps.


I would like to enter the following challenges:

Lil Patch Of Crafty Friends Challenge Blog.  Theme:  Anything Goes.
Double D Challenge Blog.  Theme:  Christmas In July.
Dream Valley Challenge Blog.  Theme:  Christmas In July.
Sweet Stampin Challenge Blog.  Theme:  Christmas In July.
The Holly and Ivy Christmas Challenge. Theme:  Anything Goes Christmas.
Peace On Earth Christmas Challenge Blog.  Theme:  Anything Goes Christmas.
52 Christmas Card Throwdown Challenge Blog.  Theme:  July Technique (Santa Fussy cut).

Thank you for visiting me, I always appreciate you taking the time to leave a lovely comment.


Anet x

Tuesday 18 July 2023

AECP Level 2 Final Challenge - Altered Item/Upcycled Project - Part 2

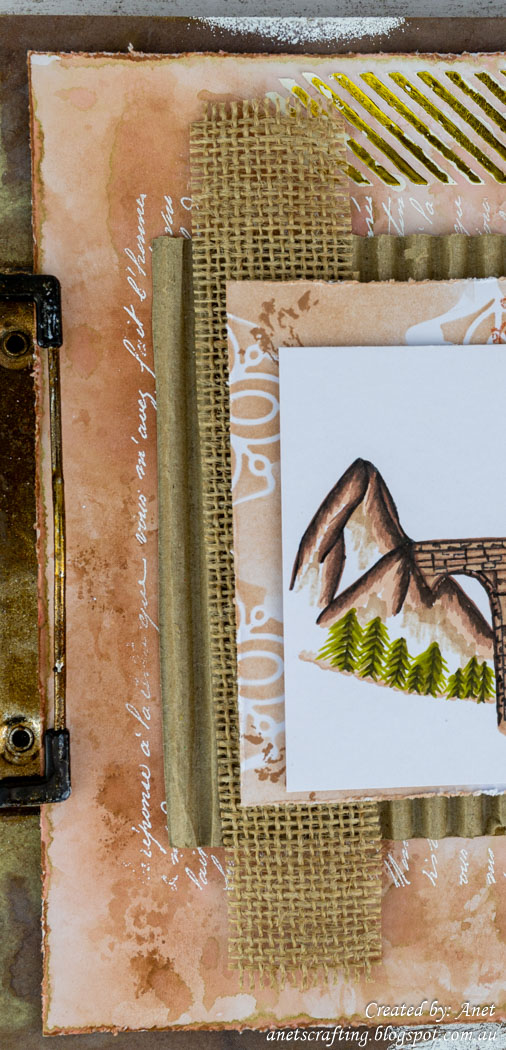
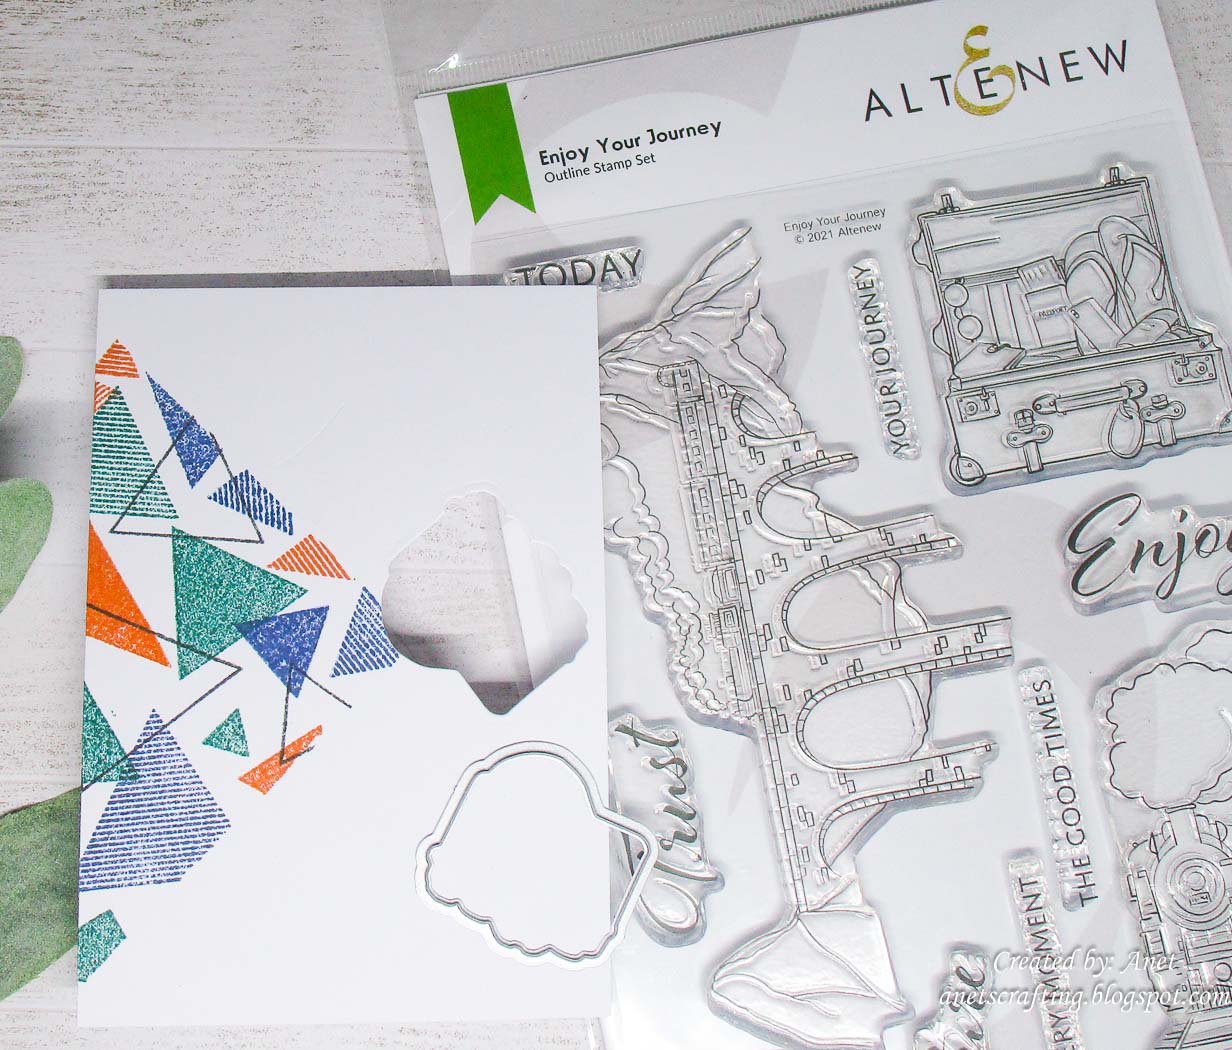
Hi Everyone, I have been challenged to create an Altered Item/Upcycled Project for my AECP Level 2 Final Challenge. I decided to altered a clipboard and create a vintage panel that have the beautiful Altenew Enjoy Your Journey Stamp Set as focal point.


Also part of the challenge is to create 4 Masculine Cards with different themes which I futured in my previous blog post. Herewith the link to: 4 Masculine Cards Blog Post.


I wanted to keep with the Masculine theme and the 3 Components from the Level 1 and 2 AECP Courses. The components I chose were:

1. Celebration Stencil Techniques
I used the Stencil Foil Technique on the panel which was not part of the AECP Course, but I think this technique creates such a wonderful shiny texture using the Altenew Buffalo Plaid Builder Stencil.  

2. Color Your Day
I used colour combinations next to each other on the colour wheel. For inspiration I used a postcard example found on Pinterest and created a vintage panel with the Altenew Enjoy Your Journey Train Stamp.

3. Impressive Heat Embossing
After colouring the clipboard with various mediums I used the Altenew Pure White Crisp Embossing Powder to create a vintage texture feeling.

I also used some of the other AECP Courses for the altered item as I learned so many techniques from the Level 1 and Level 2 courses. If you ever think of improving your crafting skills I highly recommend to consider doing the AECP Courses.

Herewith my Altered Item:


Video Tutorial

Are you ready to learn some wonderful Techniques? 
Grab a cuppa and just click the video link.


Step-by-Step Tutorial

I concentrated on the following colour inspiration:


I first coloured the clipboard and was inspired by how Luise Heinzl made it. I adapted it to work with the vintage train postcard panel I made. The rustic clipboard just compliments the Altenew Enjoy Your Journey Train image and let it stand out as focal point. 


Following on from this I wanted to give the clipboard a vintage texture look and used the Heat Embossed Technique. I inked the edges with Embossing Ink, poured the Altenew Pure White Crisp Embossing Powder onto the clipboard edges and heat embossed it.  

Be sure to check out my Video Tutorial above to learn how to add the Altenew Pure White Crisp Embossing Powder onto the clipboard. Video Link.


I then trimmed white cardstock to 8 1/2" x 11 1/4" and used the Ink Smooshing Technique with the Altenew Coffee Break Crisp Dye Ink

Tip: Adding the Dye Ink onto the acetate gives you more control of where to add ink onto the cardstock.

Be sure to check out my Video Tutorial above to learn how to use the Ink Smooshing Technique with the Altenew Coffee Break Crisp Dye InkVideo Link.


Following on from this I stamped the panel with a script stamp, heat embossed it using the Altenew Pure White Crisp Embossing Powder and distressed the edges. 


I then used the Stencil Foil Technique on the panel which was not part of the AECP Celebration Stencil Techniques Course, but I think this technique creates such a wonderful shiny texture and is a new way to step up the challenge. 

I used Gesso and foil with the Altenew Buffalo Plaid Builder Stencil and just love the wonderful shiny texture I achieved for my background. Be sure to check out my Video Tutorial above to learn how to use the Stencil Foil Technique. Video Link.

Tip: When working with Gesso, clean your stencils and tools right away. Do not allow it to dry, because it will be very difficult to clean.


Following on from this I cut a strip of cardboard to 5 1/4" x 9 1/2", burlap to 1 3/8" x 7 5/8" and added it onto the panel.


I then created my own stencil and die-cut white cardstock with the Altenew Decorative Enamels Die

Tip: This technique is such a great way to stretch the use of your die stash. Use thicker cardstock when creating your own stencil so that you can get multiple uses out of it. 

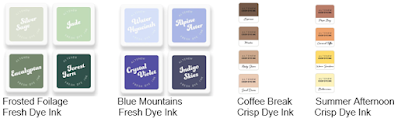
Following on from this I cut white cardstock to 4 1/2" x 8 3/4" and used the Ink Blending and Negative Masking Techniques. I ink blend through the Altenew Decorative Enamels die-cut stencil using the Altenew Coffee Break Mocca Crisp Dye Ink and I love the beautiful textured background I achieved. Be sure to check out my Video Tutorial above to learn how to use the Die-cut Stencil Technique, Ink Blending and Negative Masking Techniques. Video Link.


I then stamped the Altenew Tree of Fantasy Tree Stump Stamp onto the ink blend panel with the Altenew Coffee Break Mocca Crisp Dye Ink. Be sure to check out my Video Tutorial above to learn how to use the Altenew Tree of Fantasy Tree Stump Stamp in a totally different wayVideo Link.

Tip: Use your stamps in a totally different way for which they were intended to be used. This way you get so much more from your stamp images.


To create a Post Card theme for the panel I stamped other stamps with the Altenew Summer Afternoon Warm Sunshine Crisp Dye Ink and distressed the edges. 

Following on from this I used the Ink Blending Technique with the Altenew Blue Mountains Crystal Violet Fresh Dye Ink, die-cut it with the Altenew Decorative Enamels Die and adhered it onto the panel.


I then die-cut white cardstock with number dies, inked it with the Altenew Frosted Foliage Forest Fern Fresh Dye Ink and heat embossed it with clear embossing powder.

Tip: If you do not have the correct embossing powder use Altenew Dye Inks with clear embossing powder to achieve the correct colour combination.


Following on from this I cut blending cardstock to 3 3/4" x 6 3/8", stamped the Altenew Enjoy Your Journey Train Stamp with the Altenew Stampwheel and coloured it with the Altenew Artist Markers Mystic Garden Set JRock Garden Set DSummer Afternoon Set and Warm Grey Set. I love these Artist Markers it just blends perfectly and the end result is a beautiful bright and striking coloured image.

Tip: When colouring with Altenew Artists Markers it is important to use blending cardstock to prevent bleeding. 


To finish I stamped the Altenew Enjoy Your Journey Sentiment Stamp, heat embossed it and adhered it onto the panel using 3D foam dots.


Also do not forget to check out my Level 2 Final Challenge 4 Masculine Cards with different themes in Part 1 Blog Post. Herewith the link to: Level 2 Final Challenge 4 Masculine Cards Blog Post.

I will share more of my projects from the AECP as I work my way through the courses so stay tuned for more cardmaking posts! 

If you like what you have seen from me, please give a follow over or subscribe to my Blog and Youtube if you have not already:

My Personal blog here: 

My YouTube here: 

My Facebook here: 
https://www.facebook.com/AnetVanZyl/

Thank you for visiting me and I hope you enjoyed how I created my Level 2 Final Challenge Altered Clipboard. This was such a fun and learning experience! I always appreciate you taking the time to leave a lovely comment.

Anet x


I would like to enter the following challenges: 

Love To Scrap Challenge Blog.  Theme:  Anything Goes
Mix It Up Challenge Blog.  Theme:  Anything Goes
Crafts Galore Challenge Blog.  Theme:  Anything Goes
Classic Design Challenge Blog.  Theme:  Anything Goes.
Morgan's ArtWorld Challenge Blog.  Theme:  Anything Goes.
613 Avenue Create Challenge Blog.  Theme:  Anything Goes.

Just in case you want to do a little shopping I have added the links below (they are affiliate links which means that I will receive a small portion of the sale at no extra cost to you). I truly appreciate your support of my card adventures!

Material list:

Affiliate links are used

ALT                       ALT           ALT              ALT                ALT 


ALT                      ALT                ALT            ALT             ALT 

ALT                            ALT                         ALT                ALT 


Other Products:
  • Distress Oxide Walnut Stain & Brushed Corduroy
  • Distress Embossing Glaze Walnut Stain & Vintage Photo
  • Tim Holtz Embossing Dauber
  • Finnabair Heavy Gesso
  • Cardboard
  • Burlap
  • Couture Creations Gold Heat Activated Foil
  • MFT By The Number Dies
  • Notebook Paper Stamp
  • Darkroom Door French Script Stamp
  • Vintage Postcard Stamp
  • Wendy Vecchi Make Art Stay-tion

AECP Level 2 Final Challenge - Masculine Cards - Part 1

Hi Everyone, I am so excited to share my completed AECP Level 2 Final Challenge. I learned so many techniques from the Level 1 and Level 2 courses and are enjoying the creative AECP journey. If you ever think of improving your crafting skills I highly recommend to consider doing the AECP Courses. 

This is going to be a long post so please bear with me. 

I have been challenged to create 4 Masculine Cards with different themes (Birthday, Love/Thinking Of You, Anniversary and Encouragement). Also part of the challenge is to create an Altered Item/Upcycled Project which I will future in my second blog post. Herewith the link to: Altered Item Blog Post.


I had to select 3 Components from the Level 1 and 2 AECP Courses. The components I chose were:

1. Celebration Stencil Techniques
I learned how to utilize stencils in various ways on my projects. In the end I get more out of my stencils, other supplies and I think this a win-win situation for any crafter's stash, don't you agree?

2. Color Your Day
Sometimes we all need a pick-up and what better way to brighten up one's day by creating with beautiful colours. I learned that inspiration can come from something that might be around you everyday and that my colour wheel is one of the best craft investments I made to decide on colour ratios.

3. Impressive Heat Embossing
When I think of embossing, this song always play around in my head "Let It Shine". In this course I learned many tips and techniques about Heat Embossing. How to achieve magic with embossing powders, colouring and craft tools. 

Herewith my 4 Masculine Cards:


Step-by-Step Tutorial

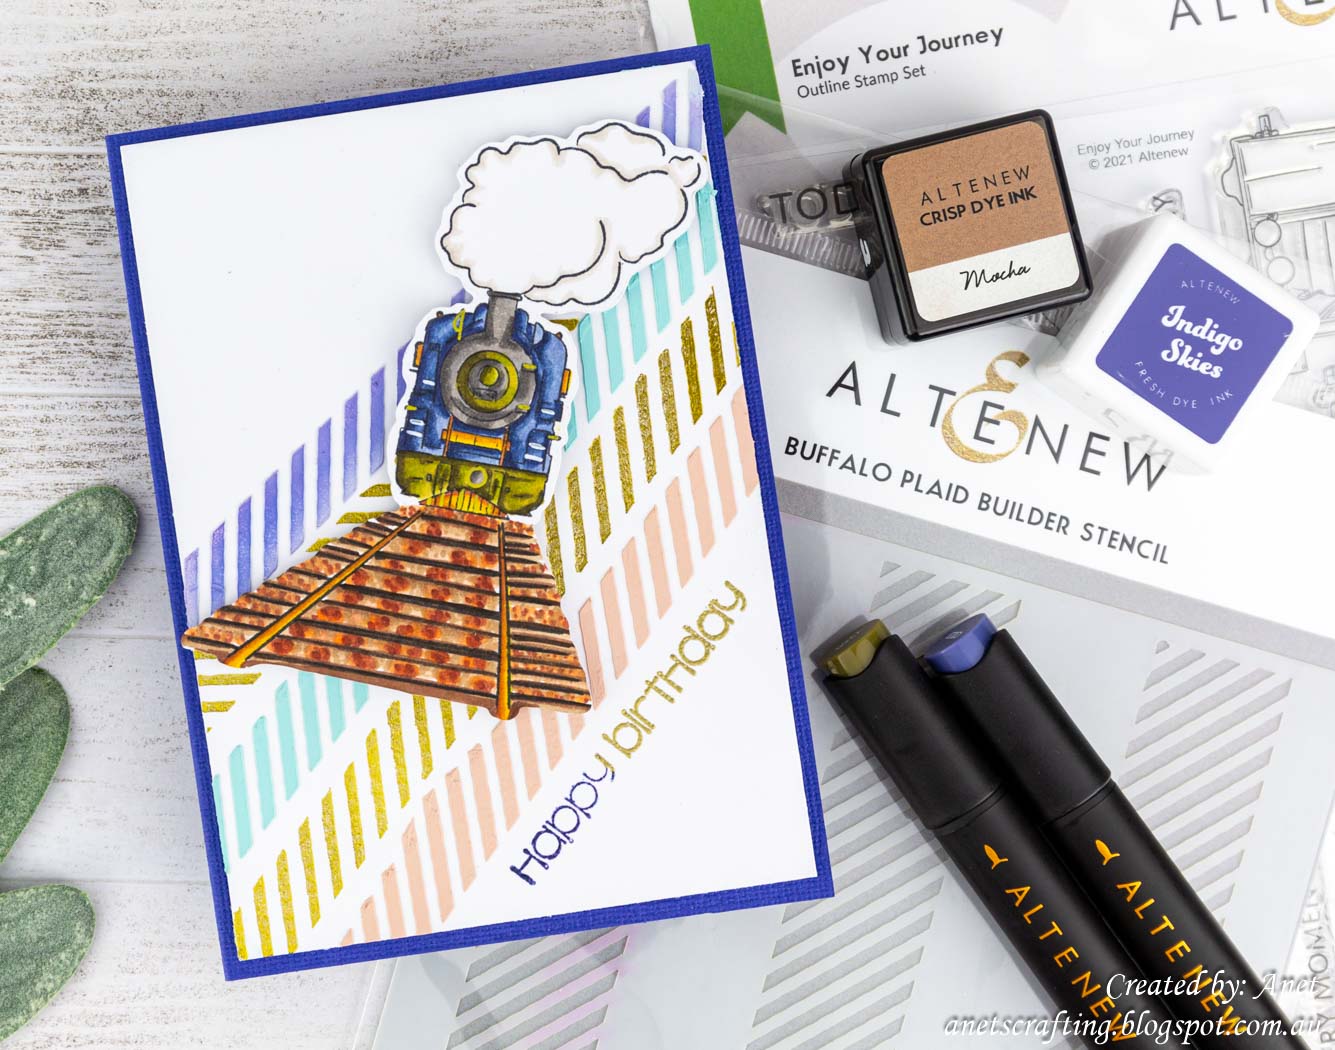
Card 1 - Birthday Card


I concentrated on the following colour inspiration:


First I trimmed cardstock to 5 3/4" x 8 1/4" and fold it to create the card base. For the panel I cut cardstock to 3 7/8" x 5 1/2".

Following on from this I used the Stencil and Embossing Paste Technique. From Laurel's Celebration Stencil Techniques Course I learned various ways to utilize stencils. I tinted Embossing Paste with the Altenew Blue Mountains Indigo Skies Fresh Dye Ink, Altenew Frosted Foliage Fresh Dye InkAltenew Coffee Break Espresso Crisp Dye Ink and used it through the Altenew Buffalo Plaid Builder Stencil.


Tip: You can create your own custom colour embossing paste by tinting the embossing paste with the Altenew's Dye Inks and by using it through the stencil you achieve texture as well as dimension.


I then used the Stencil Foil Technique which was not part of the AECP Celebration Stencil Techniques Course, but I think this technique creates such a wonderful shiny texture and is a new way to step up the challenge. 

Tip: Take your favourite technique and use your craft products in a different way to achieve amazing effects on your projects. Just by using the stencil with foil I achieved a beautiful shiny texture, stretched the use of the stencil and find a new purpose for it. 


I started placing the Heat Activated Foil onto the panel, placed the Altenew Buffalo Plaid Builder Stencil on top of the foil. I masked off half of the Altenew Buffalo Plaid Builder Stencil strip and create a beautiful smaller foil strip.

Following on from this I used a Hot Foil Pen through the Altenew Buffalo Plaid Builder Stencil

Video Tutorial

Be sure to check out my Video Tutorial 
to learn how to use the Stencil Foil Technique.


I then stamped the Altenew Enjoy Your Journey Train Stamp onto blending cardstock using the Altenew Stampwheel. Coloured the train image with the Altenew Artist Markers Mystic Garden Set JRock Garden Set DSummer Afternoon Set and Warm Grey Set. I then fussy-cut it and adhered it onto the card front using 3D foam dots.

Tip: When colouring with Altenew Artists Markers it is important to use blending cardstock to prevent bleeding. 


To finish I used the Ombre Heat Embossing Technique. First I stamped the sentiment with the Altenew Blue Mountains Alpine Fresh Dye Ink and heat embossed it with Clear Embossing Powder. I then stamped the sentiment a second time and heat embossed it using Gold Embossing Powder. I adhered the panel onto the card front using foam tape.
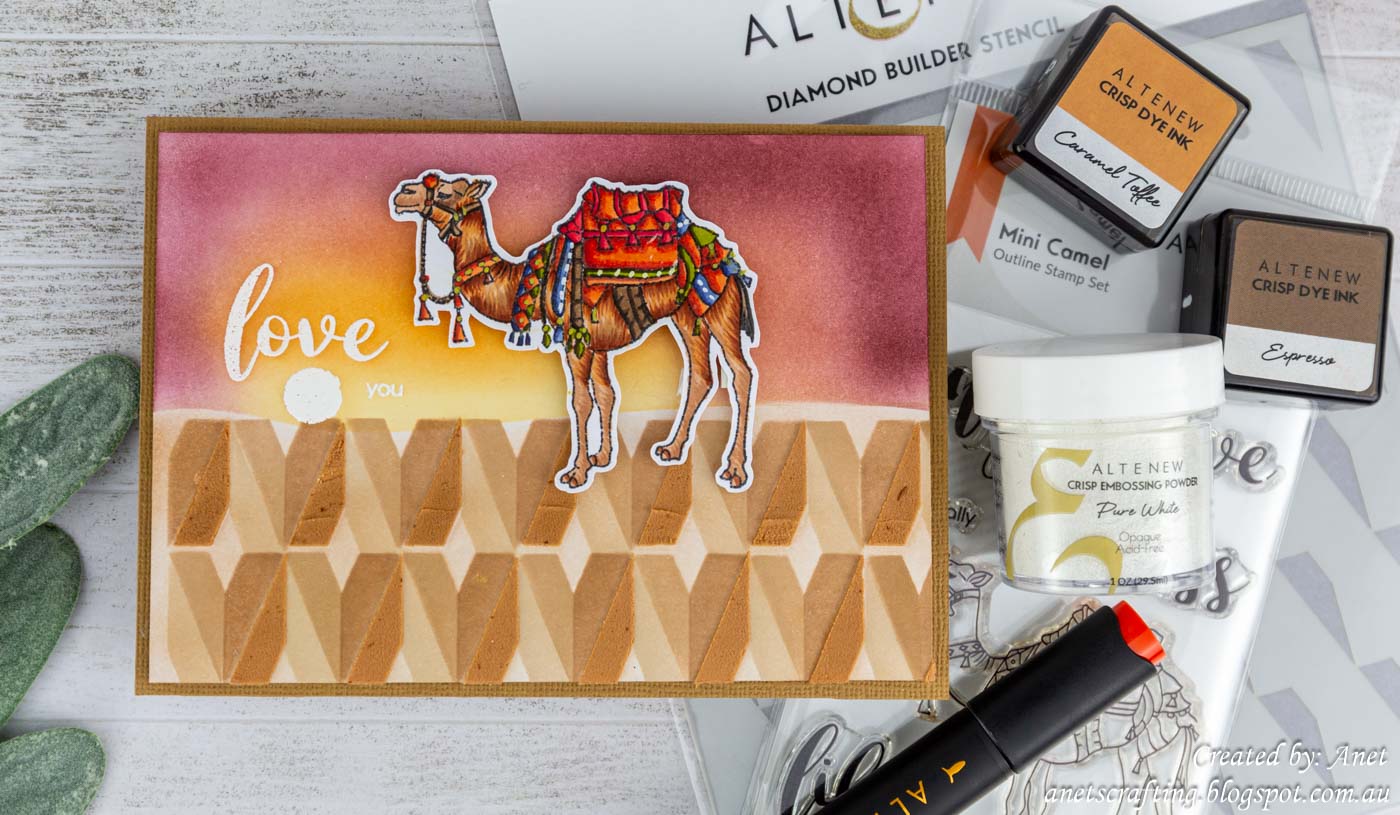

Card 2 - Love Card


I concentrated on the following colour inspiration:


First I used the Emboss Resist Technique and stamped the Altenew Mini Camel Sentiment Stamp onto cardstock and heat emboss it with the Altenew Pure White Crisp Embossing Powder

Following on from this I wanted to create a sun. I die-cut white cardstock with a small circle die, inked through the die-cut stencil with Versamark Embossing Ink and heat emboss it using the Altenew Pure White Crisp Embossing Powder.


I then used the Ombre Ink Blending Technique and created a sunset background using a stencil with the Altenew Woodland Escape Fresh Dye Ink and Altenew Summer Afternoon Crisp Dye Ink.


Following on from this I used the Stencil and Embossing Paste Technique and mixed the Altenew Coffee Break Crisp Dye Ink with Embossing Paste. I used the inked embossing paste through the Altenew Diamond Builder Stencil and let it dry.

Tip: Clean your tools and stencil right away when you work with Embossing Paste. Do not allow it to dry it will be difficult to clean.


I then used the Stencil Ink Blending Technique and ink blend through the Altenew Diamond Builder Stencil using the Altenew Coffee Break Crisp Dye Ink. I then let it dry and added it onto the card front using foam tape.


Following on from this I stamped the Altenew Mini Camel Stamp onto blending cardstock with the Altenew Stampwheel and coloured it with the Altenew Artist Markers Mystic Garden Set JRock Garden Set D, Summer Afternoon Set and Warm Grey Set.


To finish I fussy-cut die camel image and adhered it onto the card front using 3D foam dots.


Card 3 - Anniversary Card


From Therese's Color Your Day Course I learned that colour inspiration can come from a photo or something that is even around you everyday. 

I concentrated on the following colour inspiration and photo I found on Pinterest:


First I used the Ombre Ink Blending Technique and ink blended through the Altenew Deco Wallpaper Stencil using the Altenew Blue Mountains Fresh Dye Ink. I then let it dry and added it onto the card front using the Altenew Ultra Sticky Double-Sided Tape.


Following on from this I trimmed white cardstock to 2 5/8" x 3 7/8" and cut it at an angle. I stamped a sentiment using the Altenew Stampwheel, heat embossed it and added it onto the card front using 3D foam dots.


Tip: To make sure that you stamp the Altenew Tree of Fantasy Tree Top and Stump Stamps in the correct position, first die-cut cardstock with the Altenew Tree of Fantasy Die and use the negative space as a guide.


I enjoyed Svetlana's Impressive Heat Embossing Course and learned so many tips and techniques to add shine on projects using heat embossing. For this card I used the Layered Heat Embossing Technique with the Altenew Tree of Fantasy A1 Stamp. I stamped the Altenew Tree of Fantasy A1 Stamp using the Altenew Stampwheel with the Altenew Frosted Foliage Jade Fresh Dye Ink and heat embossed it with the Clear Embossing Powder. 


For the second layer I stamped the Altenew Tree of Fantasy A2 Stamp using the Altenew Stampwheel with the Altenew Frosted Foliage Eucalyptus Fresh Dye Ink and heat embossed it with Clear Embossing Powder. 

Tip: Always use antistatic powder before you heat embossed. This prevents embossing powder from straying and sticking where its not wanted. Make sure your heat tool has had around 30 - 60 seconds to warm up before bringing the heat tool to your project, this reduces warping.


Following on from this for the third layer I stamped the Altenew Tree of Fantasy A3 Stamp using the Altenew Stampwheel with the Altenew Frosted Foliage Forest Fern Fresh Dye Ink and heat embossed it with Clear Embossing Powder.

Tip: If you do not have the embossing powder colour you need, use Altenew's Dye Inks with clear embossing powder.


I then followed the same steps as above for the Altenew Tree of Fantasy Stump Stamp. For the first layer I stamped the Altenew Tree of Fantasy Stump B1 Stamp using the Altenew Stampwheel with the Altenew Coffee Break Rocky Shore Crisp Dye Ink and heat embossed it with Clear Embossing Powder. 


Following on from this for the second layer I stamped the Altenew Tree of Fantasy Stump B2 Stamp using the Altenew Stampwheel with the Altenew Coffee Break Mocha Crisp Dye Ink and heat embossed it with Clear Embossing Powder. 


For the third layer I stamped the Altenew Tree of Fantasy Stump B3 Stamp using the Altenew Stampwheel with the Altenew Coffee Break Espresso Crisp Dye Ink and heat embossed it with Clear Embossing Powder.


Following on from this for the last layer I stamped the Altenew Tree of Fantasy Stump B4 Stamp using the Altenew Stampwheel with Embossing Ink and heat embossed it with Altenew Pure White Crisp Embossing Powder.


I then die-cut the embossed tree image with the Altenew Tree of Fantasy Die and adhered it onto the card front using 3D foam dots.


To finish I added some shadow details underneath the tree using the Altenew Artist Markers Warm Grey Set.


Card 4 - Encouragement Card


Did you ever wonder how many colours to add on your project? From Therese's Color Your Day Course I learned a wonderful go-to formula which I definitely will use in future and already have done so for my cards and altered project.


I concentrated on the following colour inspiration and for the colour ratio I choose blue as the main colour, Green for the second colour and lastly but not least Red-Orange:


First I created my own stencil by die-cutting white cardstock with a square die to get a triangle stencil.

Tip:  Use thicker cardstock when creating your own stencil so that you can get multiple uses out of it. 


Following on from this I randomly stamped the Altenew Sohcahtoa Stamp inside the square die-cut stencil using the Altenew Blue Mountains Indigo Skies Fresh Dye InkAltenew Frosted Foliage Forest Fern Fresh Dye InkAltenew Summer Afternoon Paper Bag Crisp Dye Ink and Memento Black Ink.

Tip: If your cardstock gets warped, bend it in different directions or run it through your die-cutting machine. Be careful not to use your most loved cutting plate otherwise it will leave marks on your cardstock.


I then used the Inlaid Die-Cut Technique and die-cut the panel with the Altenew Enjoy Your Journey Camera Die.

Tip: Use the Inlaid Die-Cut Technique to achieve more interest and dimension on your project.


Following on from this I stamped the beautiful encouragement sentiment from the Altenew Meadow Reflections Sentiment Stamp and heat embossed it. I adhered the panel onto the card front using foam tape.


Following on from this I die-cut the coloured camera image with the Altenew Enjoy Your Journey Camera Die.


To finish I added the die-cut camera image into the negative space using 3D foam dots to get some dimension.


Also do not forget to check out my Level 2 Final Challenge Altered Item/Upcycled Project in Part 2 Blog Post. Herewith the link to: Level 2 Final Challenge Altered Item Blog Post.

I will share more of my projects from the AECP as I work my way through the courses so stay tuned for more cardmaking posts! 

If you like what you have seen from me, please give a follow over or subscribe to my Blog and Youtube if you have not already:

My Personal blog here: 

My YouTube here: 

My Facebook here: 
https://www.facebook.com/AnetVanZyl/

Thank you for visiting me and I hope you enjoyed how I created my Level 2 Final Challenge Masculine Cards. This was such a fun and learning experience! I always appreciate you taking the time to leave a lovely comment.

Anet x


I would like to enter the following challenges: 

Monday Greetings Challenge Blog.  Theme:  Anything Goes Greeting.
Love To Scrap Challenge Blog.  Theme:  Anything Goes
Mix It Up Challenge Blog.  Theme:  Anything Goes
Aud Sentiments Challenge Blog.  Theme:  Stencils & Sentiment.
Classic Design Challenge Blog.  Theme:  Anything Goes.
Morgan's ArtWorld Challenge Blog.  Theme:  Anything Goes.
613 Avenue Create Challenge Blog.  Theme:  Anything Goes.

Just in case you want to do a little shopping I have added the links below (they are affiliate links which means that I will receive a small portion of the sale at no extra cost to you). I truly appreciate your support of my card adventures!


Material list:

Affiliate links are used

ALT                         ALT                       ALT                  ALT 

ALT                          ALT                   ALT                 ALT 

ALT                    ALT             ALT              ALT                ALT 

ALT                    ALT                   ALT              ALT                ALT 

ALT                                   ALT                           ALT


Other Products:
  • Simon Says Stamp Holiday Horizon Stencil
  • Wendy Vecchi Embossing Paste
  • Wendy Vecchi Make Art Stay-tion
  • Wow Gold Super Fine Embossing Powder
  • Versamark Embossing Ink
  • Memento Black Ink
  • Clear Embossing Powder
  • Circle Die
  • Square Die
  • Couture Creations Heat Activated Foil
  • Couture Creations Hot Foil Pen

Related Posts Plugin for WordPress, Blogger...