Wednesday 18 September 2019

Sweetheart - The Paper Shelter Challenge

Hi Everyone, are you ready ...

It is time for a new challenge at Paper Shelter
and the theme is Digital Image.

Now here is my card 
using Sweetheart
Coloured with Copic Sketch Markers.


Sentiment: Scrap Dragon Happy Anniversary. Dies: Memory Box Owl Heart Tree and Stitched Circle. MFT Woodgrain Fence. White Gel Pen.

Our Sponsor The Paper Shelter are offering one lucky winner a fabulous gift certificate of $30. But, you must use a Paper Shelter product on your card or project. This could be a Paper Shelter Image, Paper or Printable. If you don't use a Paper Shelter product, you could still win 3 digi images of your own choice. So it really is a win win situation don't you think.


Make sure you go over to The Paper Shelter Shop and take a look at all the beautiful digital stamps.


I would like to enter the following challenges:

Crafts Galore Challenge Blog.  Theme:  Anything Goes.
Love To Craft Challenge Blog.  Theme:  Anything Goes.
Classic Design Team Challenge Blog.  Theme:  Anything Goes.
Love To Scrap Challenge Blog.  Theme:  Anything Goes.
Morgan's ArtWorld Challenge Blog.  Theme:  Anything Goes.
Crafting With An Attitude Challenge Blog.  Theme:  Anything Goes.
Brown Sugar Challenge Blog.  Theme:  Anything Goes.
The Creative Crafters Challenge Blog.  Theme: Anything Goes.
World Wide Open Design Team Challenge Blog.  Theme:  Anything Goes.
Lil Patch Of Crafty Friends Challenge Blog.  Theme:  Anything Goes.

Thank you for visiting me, I always appreciate you taking the time to leave a lovely comment.


Anet x

Tuesday 17 September 2019

Pop Up Slider Christmas Card - Couture Creations

Hi Everyone, Anet here today 
and welcome to my inspiration post

I made a Pop Up Slider Christmas Card
with the new releases Naughty Or Nice,  
Dazzlia and Delightful Sentiments Collection


Step by step instructions:

1. Trim Cypress Pine Cardstock to 4 1/4" x 5 1/2"
and Naughty or Nice Pattern Paper to 4" x 5 1/2".


Here is the link to the video on how to: 
- Partial die-cut with Modern Essentials Rectangle Cut, Foil and Emboss Die;
- Create Pop Up Section with Mini Score Board and
- Create the Slider.

Video Link:
https://youtu.be/QsoLJJWcaLo


2. Use Partial Die-cut Technique with Cut, Foil and Emboss Die:

- Place patterned paper on first cutting plate.

- Lay Modern Essentials Rectangle Cut, Foil and Emboss Die
in the centre of the patterned paper. 

- Carefully place the second cutting plate on top of the die
so that everything is covered by the plate 
except for one end of the rectangle die.

- Run through the die-cutting machine.

3. Creating the Pop Up Section:

- Using the Mini Score Board create a score line
across the top section of the rectangle to create a fold
(section that was not cut).

- Create a score line in the centre of the rectangular piece.

- Create last score line on the end of the rectangular shape.
Score line needs to be approximately 1/4".

- Fold on all of the score lines to create a little tent.


4. Creating the Slider:

- Trim Cypress Pine Cardstock to 2 7/16" x 4 3/4".

- Trim Naughty or Nice Pattern Paper to 2 5/16" x 4 5/8"
and adhere onto cardstock using double sided tape.

- Take cardstock and slide it in behind
the rectangular shape on your patterned paper
until it meet up with the bottom of the rectangular opening.

- Add glue to the 1/4" scored section on the bottom of the card.
Lay the rectangle section flat and adhere the 1/4" section
to the bottom of the green slider piece.

- Flip over the patterned paper, with the slider piece attached,
and add double sided tape to the side
and bottom of the patterned paper.
You want to make sure that you do not add any double sided tape
to the green slider piece or it will not slide.

- Adhere onto the card base.


5. Grab the slider and create a small hole in the slider.
Thread a bit of ribbon through the hole and tie a little knot.


6. Use Inked Letterpress Technique with Cut Foil and Emboss Die:

- Ink Have Faith Cut Foil and Emboss Die.

- Place Cypress Pine Cardstock onto die
and run through die-cutting machine.

- Adhere onto top of slider.


7. Die-cut with Cut Foil and Emboss Die:

- Place Mirror Board onto 
Hope Sentiment Cut Foil and Emboss Die.

- Run through die-cutting machine
and adhere onto card front.


8.  Die-cut Mirror Board with
Naughty or Nice Dasher Mini Die;
Ultimate Crafts Rambling Rose Mini Sprigs Die and
Love Sentiment Mini Die.

Adhere onto card front.


9. Die-cut Cypress Pine Cardstock
with Highland Christmas Forest Die.

Adhere onto card front using 3D foam dots.


10. Add Naughty or Nice Die-Cut Ephemera 
onto card front to finish.


Couture Creations products I have used:


C0726752 Mini Score Board
C0726739 Dazzlia Have Faith Sentiment Mini Cut Foil and Emboss Die
C0726959 Delightful Hope Sentiment Cut Foil and Emboss Die
C0726904 Naughty or Nice Dasher Mini Die
C0726890 Naughty or Nice Pattern Paper 03B and 08B
C0726903 Naughty or Nice Die-cut Ephemera Set
C0726456 Modern Essentials Nesting Rectangles Cut, Foil and Emboss Die
C0726091 Mini Die - Love Sentiment & Heart
C0726291 Highland Christmas - Christmas Forest Die
ULT157321 Ultimate Crafts Rambling Rose Mini Sprigs Die
ULT200031 Ultimate Crafts Cypress Pine Cardstock
C0725410 Mirror Board Matte Gold
J7023-091 Brilliance Galaxy Gold Ink Pad
AD90017 Couture Creations Double Sided Tape 12mm
C0726428 Couture Creations Foam Dots

For Stockists click the link below:
https://couturecreations.com.au/pages/store-locator


 I would like to enter the following challenges:

Classic Design Team Challenge Blog.  Theme:  Anything Goes.
Morgan's ArtWorld Challenge Blog.  Theme:  Anything Goes.
Brown Sugar Challenge Blog.  Theme:  Anything Goes.
Creative Fingers Challenge Blog.  Theme:  Anything Goes.
Crafty Creations Challenge Blog.  Theme: Anything Goes.
The Creative Crafters Challenge Blog.  Theme: Anything Goes.
World Wide Open Design Team Challenge Blog.  Theme:  Anything Goes.

Thank you for visiting today and I hope you enjoyed 
how I created my Pop Up Slider Christmas Card.
Happy Crafting!

Anet

Wednesday 4 September 2019

A Cheerful Hummingbird - The Paper Shelter Challenge

Hi Everyone, are you ready ...

It is time for a new challenge at Paper Shelter
and the theme is Dress It Up!

Now here is my Calendar card 
using A Cheerful Hummingbird
Coloured with Copic Sketch Markers.


Dies: Couture Creations: Gentleman Crafter Woven Circles Background, Le Petit Jardin: Bending Branches and Evening Branch, C'est La Vie Collection of Ferns and Geraniums and Butterfly Garden: Ornate Corners and Baby Moths and Ultimate Crafts Rambling Rose Mini Sprigs. Pattern Paper: Couture Creations Le Petit Jardin Collection.

Our Sponsor The Paper Shelter are offering one lucky winner a fabulous gift certificate of $30. But, you must use a Paper Shelter product on your card or project. This could be a Paper Shelter Image, Paper or Printable. If you don't use a Paper Shelter product, you could still win 3 digi images of your own choice. So it really is a win win situation don't you think.


Make sure you go over to The Paper Shelter Shop and take a look at all the beautiful digital stamps.


I would like to enter the following challenges:

Creative Sketchy Girls Challenge Blog.  Theme:  Butterflies.
Incy Wincy Design Challenge Blog.  Theme:  Things With Wings.
Crafty Cardmakers Challenge Blog.  Theme:  Pearls and/or Gems.
The Creative Crafters Challenge Blog.  Theme:  Anything Goes.
Crafty Creations Challenge Blog.  Theme:  Anything Goes.
Crafts Galore Challenge Blog.  Theme:  Anything Goes.
Love To Craft Challenge Blog.  Theme:  Anything Goes.
Love To Scrap Challenge Blog.  Theme:  Anything Goes.
Double D Challenge Blog.  Theme:  Featured.

Thank you for visiting me, I always appreciate you taking the time to leave a lovely comment.


Anet x

50th Anniversary Box and Card - Couture Creations

Hi Everyone, Anet here today 
and welcome to my inspiration post

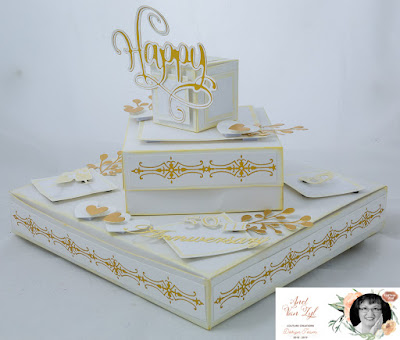
I made a 50th Anniversary Box and Card
with the new releases
Dazzlia and Delightful Sentiments Collection


Step by step instructions:

1. First Box:

Trim white cardstock four times to 2cm x 18cm.


- Heat GoPress & Foil Machine.

- Place Gentleman's Emporium Hot Foil Stamp onto heat plate.

- Place Heat Activated Foil with the shiny side down.

- Place cardstock onto foil.

- Close lid and heat up for 30 seconds.

- Wind slowly through die-cutting machine.

Adhere onto box.


3. Second Box:

Box:  Trim white cardstock to 18cm x 18cm.
Score at 4cm.

Lid: Trim white cardstock to 15.2cm x 15.2cm.
Score at 2.5cm.


Here is the link to the video on how to 
assemble the box using the Couture Creations Mini Scoreboard.

Video Link:
https://youtu.be/jrflds_vTDc


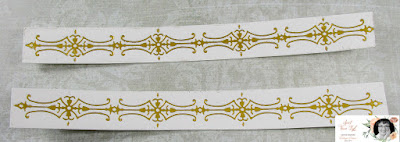
4. Trim white cardstock twice to 2cm x 18cm.

Foil with Gentleman's Emporium Border Collection Hot Foil Stamp.

Trim in half and adhere onto box.


5. Adhere second box onto first box
using double sided tape.


6. Ink and Cut white cardstock with 
Modern Essentials Nesting Squares Cut, Foil and Emboss Die.


7. Adhere onto first and second box using 3D foam dots.


8. Ink and Cut white cardstock with 
Dazzlia Raise A Glass Silhoutte Cut, Foil and Emboss Die,
Dazzlia Invite Banner Cut, Foil and Emboss Die and
Numeric Set Cut, Foil and Emboss Die.

Adhere onto card front using 3D foam dots.


9. Die-cut white cardstock with Anniversary Die
and adhere onto card front using 3D foam dots.


10. Small Box:

Trim white cardstock to 12cm x 17.2cm.
Score on the short side at 4cm and 8cm.
Score on the long side at 4cm, 8cm, 12cm and 16cm.


11. Watch my previous video on how to cut the 
small box with the Couture Creations Craft Knife

Video Link:
https://youtu.be/jeXI4AW2dCc


12. Ink and Cut white cardstock with 
Modern Essentials Nesting Squares Cut, Foil and Emboss Die.


Adhere onto small box using 3D foam dots.


- Heat Metal Conversion Plate with GoPress & Foil Machine.

- Place Delightful Sentiment Die onto metal conversion plate.

- Place Heat Activated Foil with the shiny side down.

- Place white cardstock onto foil.

- Close lid and heat up for 30 seconds.

- Run through GoPower and Emboss Machine.

Adhere onto small box.


14. Adhere small box onto second box using double sided tape.


15. Die-cut Couture Creations Mirror Board with
Couture Creations Le Petit Jardin Evening Branch and heart die.

Adhere onto first and second box using 3D foam dots.


16. Die-cut white cardstock with heart die and
adhere onto first and second box using  3D foam dots.


17. Card:

Fold Couture Creations Square cardstock to create card base.

Trim Couture Creations Mirror Board to 13cm and 10cm.

Trim white cardstock to 12cm.


18. Stick white cardstock onto mirror board cardstock.
Adhere onto card front.


19. Ink and Cut white cardstock with 
Gentleman Crafter Woven Circles Background Cut, Foil and Emboss Die.


20. Stick onto mirror board cardstock.


21. Adhere onto card front.


22. Die-cut Couture Creations Mirror Board with
Numeric Set Cut, Foil and Emboss Die,
butterfly and letter dies.


23. Adhere onto card front using 3D foam dots to finish.


Couture Creations products I have used:


C0726520 GoPower & Emboss Machine
C0725032 GoPress and Foil Machine
C0726752 Mini Score Board
C0725818 GoPress & Foil Metal Conversion Plate
C0725355 Gold Vintage Matte Finish Heat Activated Foil
C0726956 Delightful Sentiments Happy
C0726749 Dazzlia Raise A Glass Silhouette
C0726719 Dazzlia Invite Sentiment & Banner
C0726778 Gentleman Crafter Woven Circles Background Cut, Foil and Emboss Die
C0726848 Gentleman's Emporium Border Collection
C0726426 Numeric Set
C0725937 Le Petit Jardin Evening Branch
C0724845 Couture Creations Square Card and Envelopes
C0725410 Couture Creations Mirror Board Matte Gold
C0726428 Couture Creations Foam Dots
AD90017 Couture Creations Double Sided Tape 12mm

For Stockists click the link below:
https://couturecreations.com.au/pages/store-locator

I would like to enter the following challenges:

Crafty Creations Challenge Blog.  Theme:  Anything Goes.
Crafts Galore Challenge Blog.  Theme:  Anything Goes.
Love To Craft Challenge Blog.  Theme:  Anything Goes.
Classic Design Team Challenge Blog.  Theme:  Anything Goes.
Morgan's ArtWorld Challenge Blog.  Theme:  Anything Goes.
Make My Monday Challenge Blog.  Theme:  Use Shapes On Your Card.
Incy Wincy Design Challenge Blog.  Theme:  Things With Wings.
Crafty Sentiments Designs Challenge Blog.  Theme:  Anything Goes.

Thank you for visiting today and I hope you enjoyed 
how I created my 50th Anniversary Box and Card.  
Happy Crafting!

Anet

Related Posts Plugin for WordPress, Blogger...