Wednesday 23 September 2020

Full Of Hope - The Paper Shelter

Hi Everyone, are you ready ...

It is time for a new challenge at Paper Shelter
and the theme is Blast From The Past.

Now here is my card 
using Full Of Hope
Coloured with Copic Sketch Markers.


Sentiment: LOTV Christmas Sentiment Tags. Dies: Marianne Design Mini Poinsettias and Ivy. Find It Trading Amy Design Poinsettia Corner. Impression Obsession Evergreen Trees. Glitter.

Our Sponsor The Paper Shelter are offering one lucky winner a fabulous gift certificate of $30. But, you must use a Paper Shelter product on your card or project. This could be a Paper Shelter Image, Paper or Printable. If you don't use a Paper Shelter product, you could still win 3 digi images of your own choice. So it really is a win win situation don't you think.


Make sure you go over to The Paper Shelter Shop and take a look at all the beautiful digital stamps.


I would like to enter the following challenges:

Make My Monday Challenge Blog.  Theme:  Christmas in September.
The Creative Crafters Challenge Blog.  Theme:  Anything Goes.
Crafty Friends Challenge Blog.  Theme:  Autumn Colours.
Fab 'n Funky Challenge Blog.  Theme:  Christmas.

Thank you for visiting me, I always appreciate you taking the time to leave a lovely comment.


Anet x

Tuesday 22 September 2020

Shadow Box Frame Card - Couture Creations

Hi Everyone,
Anet here today and welcome to my inspiration post.

I made a Shadow Box Frame Card
with the new releases Merry Little Christmas 
and The Gift Of Giving Collection


I found the inspiration from Sam's Blog.

Step by step instructions:

My video tutorial below will show you 
how to take a 6" x 6" card base to new heights
by adding a shadow box frame.


Add Liquid Drops 3D Pearls and adhere 
onto box frame using 3D foam dots.


Die-cut Matte Gold Mirror Board twice with
adhere onto box frame.  Add gemstones.


Die-cut Cypress Pine Cardstock four times with
The Gift Of Giving Holly Border Die and adhere onto box frame.


The Gift Of Giving Merry Christmas Die and adhere inside box frame.


Die-cut Garnet Cardstock and white cardstock
Layer onto each other and adhere inside box frame using 3D foam dots.


Cut Cypress Pine Cardstock to 5 3/4" x 5 3/4"
and white cardstock to 5 1/2 x 5 1/2".
Layer onto each other and adhere to the inside of the card base.


Die-cut Matte Gold Mirror Board four times with
adhere onto white cardstock to finish.


Diagram for cutting patterned paper to create shadow box frame:


Are you ready to learn how to create 
this fabulous shadow box frame card ... 
just press the video link below and follow my video tutorial.


https://youtu.be/g5fRYWXE3C0


C0726520 GoPower & Emboss Machine
C0727163 GoPower & Emboss Magnetic Platform
C0726342 Scoring Board 12 x 12
ULT200087 12 x 12 Ultimate Crafts Ivory Cardstock
ULT200031 12 x 12 Ultimate Crafts Cypress Pine Cardstock
ULT200067 12 x 12 Ultimate Crafts Garnet Cardstock
C0725410 Matte Gold Mirror Board
C0727945 12 x 12 Merry Little Christmas Double Sided Patterned Paper Sheet 01
C0727910 The Gift Of Giving Layered Poinsettia Stamp and Die Set
C0727914 The Gift Of Giving Candy Cane Die
C0727916 The Gift Of Giving Holly Border Die Set
C0727917 The Gift Of Giving Holly Frame Die Set
C0727920 The Gift Of Giving Merry Christmas Die
ULT157649 Liquid Drops 3D Pearls Pharoah

For Stockists click the link below:

I would like to enter the following challenges:

Make My Monday Challenge Blog.  Theme:  Christmas in September.
The Creative Crafters Challenge Blog.  Theme:  Anything Goes.
Crafty Friends Challenge Blog.  Theme:  Autumn Colours.
Allsorts Challenge Blog.  Theme:  My Lovely Garden.

Thank you for visiting today and I hope you enjoyed 
how I created my shadow box frame card.  
Happy Crafting!

Anet


Saturday 12 September 2020

Australia Interactive Scrapbook Layout - Couture Creations

Hi Everyone,
Anet here today and welcome to my inspiration post.

I made an Australia Interactive Scrapbook Layout
with the new release Sweeping Plains Collection


I found the inspiration from attending Jenny Heaslip's class 
and incorporated some of the inspiration into my scrapbook layout.

Step by step instructions:

My video tutorial below will show you how
to create an interactive scrapbook layout.


Create a texture background randomly on the 
using embossing paste and a stencil.


The scrapbook layout is loaded with 
interactive features where you can add more photos.
 I will show you how to do this in my video tutorial.


Paper Bag Cardstock to create interactive layouts.
Follow my video tutorial below to learn how to add these features.


First interactive layout - Photo 1


Follow my video tutorial below to adhere
the following above Photo 1:

Follow my video tutorial below to adhere
the following between the scored lines:


Follow my video tutorial below to adhere
the following underneath Photo 1:


First interactive layout - Photo 2


Follow my video tutorial below 
to adhere the following:


Follow my video tutorial below to adhere
the following above Photo 2:


Follow my video tutorial below to adhere
the following underneath Photo 3:


Second interactive layout - Photo 4 and 5

Follow my video tutorial below 
to adhere the following: 


Second interactive layout - Photo 6 and 7


Follow my video tutorial below to adhere
the following above Photo 6:


Follow my video tutorial below to adhere
the following underneath Photo 7:


Follow my video tutorial below to adhere
the following behind second interactive layout:


Follow my video tutorial below to adhere
the following in the right bottom corner:


Are you ready ... 
get a nice cup of tea or coffee
and press the video link below to follow my video tutorial.

Video Link:

https://youtu.be/3-UZpul2luI


Couture Creations products I have used:


C0726520 GoPower & Emboss Machine
C0727163 GoPower & Emboss Magnetic Platform
C0726342 Scoring Board 12 x 12
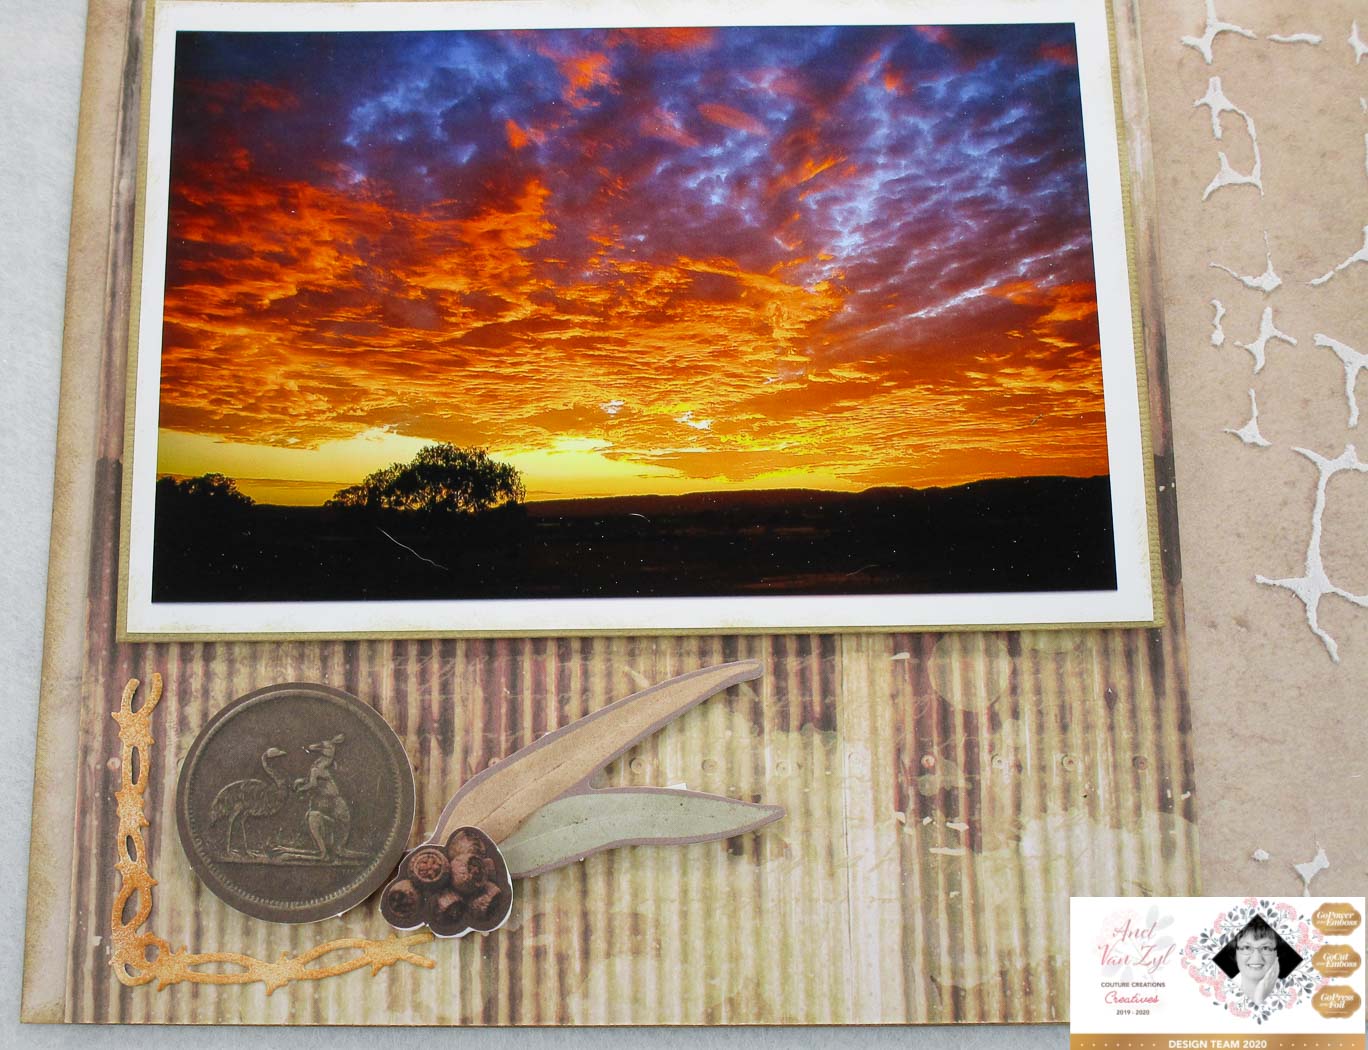
ULT200045 12 x 12 Ultimate Crafts Paper Bag Cardstock
C0727972 12 x 12 Sweeping Plains Patterned Paper Double Sided 5
C0727975 12 x 12 Sweeping Plains Patterned Paper Double Sided 8
C0727976 12 x 12 Sweeping Plains Patterned Paper Double Sided 9
C0727978 12 x 12 Sweeping Plains Patterned Paper Double Sided 11
C0727980 Sweeping Plains Die-cut Ephemera Set
C0727981 Sweeping Plains Die-cut Sentiment Set
C0727986 Sweeping Plains Australian Animals Stamp and Die Set
C0727983 Sweeping Plains Kangaroo Stamp and Die Set
C0727984 Sweeping Plains Kookaburra Stamp and Die Set
C0727994 Sweeping Plains Sitting On The Fence Die
C0727989 Sweeping Plains Fair Dinkum Stamp
C0727996 Sweeping Plains Barbed Wire Die Set
C0727998 Sweeping Plains Bloomin Protea Die
C0727711 Steampunk Dreams Mesh Die
C0727712 Steampunk Dreams Distressed Tags 
C0727227 Sunburnt Country Acacia Branch Die
C0727230 Sunburnt Country G'Day Mate Die
C0727232 Sunburnt Country Road Trip Die
C0727233 Sunburnt Country Fenced In Die
C0727221 Sunburnt Country Eucalyptus Branch Die
C0727292 Sunburnt Country Australian Flourish 
Cut, Foil and Emboss Die
C0727211 Sunburnt Country Adventure Stamp
ULT157334 Australiana Grass Tree Die
ULT157321 Australiana Rusty Old Ute Die
ULT157473 Australiana Old Farm Cart Die
AD90017 Couture Creations Double Sided Tape 12mm

For Stockists click the link below:
https://couturecreations.com.au/pages/store-locator

I would like to enter the following challenges:

My Time To Craft Challenge Blog.  Theme:  Embossing Wet or Dry (Heat emboss sentiments).
2 Crafty Critter Crazies Challenge Blog.  Theme:  Anything Goes.
Crafty Animals Challenge Blog.  Theme:  Anything Goes.
Classic Design Challenge Blog.  Theme:  Anything Goes.
Love To Scrap Challenge Blog.  Theme:  Anything Goes.
Crafts Galore Challenge Blog.  Theme:  Anything Goes.
Crafty Calendar Challenge Blog.  Theme:  Anything Goes.
Morgan's ArtWorld Challenge Blog.  Theme:  Anything Goes.
Mix It Up Challenge Blog.  Theme:  Anything Goes.

Thank you for visiting today and I hope you enjoyed 
how I created my interactive scrapbook layout.  
Happy Crafting!

Anet


Related Posts Plugin for WordPress, Blogger...