
Hi Everyone, I have been challenged to create an Altered Item/Upcycled Project for my AECP Level 2 Final Challenge. I decided to altered a clipboard and create a vintage panel that have the beautiful Altenew Enjoy Your Journey Stamp Set as focal point.

Also part of the challenge is to create 4 Masculine Cards with different themes which I futured in my previous blog post. Herewith the link to: 4 Masculine Cards Blog Post.

I wanted to keep with the Masculine theme and the 3 Components from the Level 1 and 2 AECP Courses. The components I chose were:
1. Celebration Stencil Techniques
I used the Stencil Foil Technique on the panel which was not part of the AECP Course, but I think this technique creates such a wonderful shiny texture using the Altenew Buffalo Plaid Builder Stencil.
2. Color Your Day
I used colour combinations next to each other on the colour wheel. For inspiration I used a postcard example found on Pinterest and created a vintage panel with the Altenew Enjoy Your Journey Train Stamp.
3. Impressive Heat Embossing
After colouring the clipboard with various mediums I used the Altenew Pure White Crisp Embossing Powder to create a vintage texture feeling.
I also used some of the other AECP Courses for the altered item as I learned so many techniques from the Level 1 and Level 2 courses. If you ever think of improving your crafting skills I highly recommend to consider doing the AECP Courses.
Herewith my Altered Item:

Video Tutorial
Are you ready to learn some wonderful Techniques?
Grab a cuppa and just click the video link.
Step-by-Step Tutorial
I concentrated on the following colour inspiration:

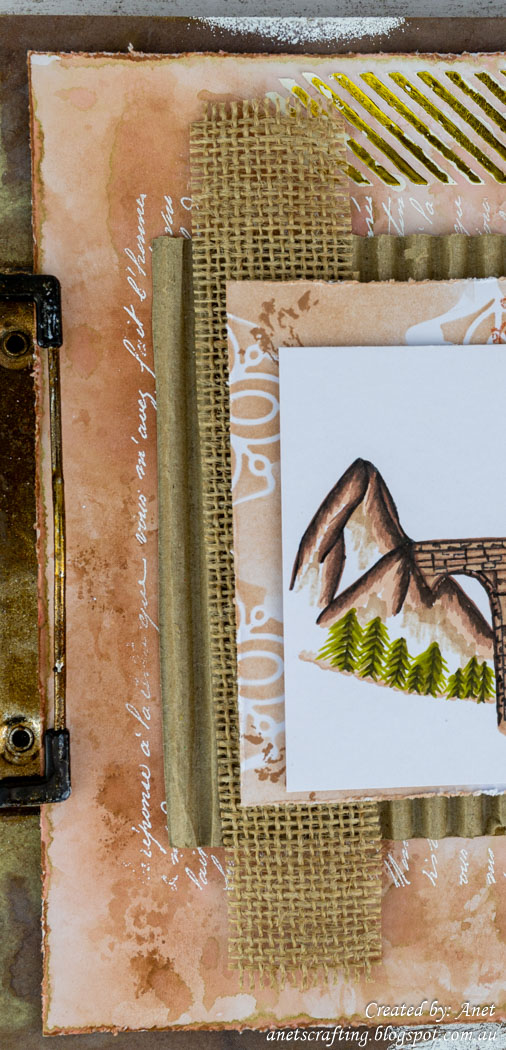
I first coloured the clipboard and was inspired by how Luise Heinzl made it. I adapted it to work with the vintage train postcard panel I made. The rustic clipboard just compliments the Altenew Enjoy Your Journey Train image and let it stand out as focal point.

Following on from this I wanted to give the clipboard a vintage texture look and used the Heat Embossed Technique. I inked the edges with Embossing Ink, poured the Altenew Pure White Crisp Embossing Powder onto the clipboard edges and heat embossed it.
Be sure to check out my Video Tutorial above to learn how to add the Altenew Pure White Crisp Embossing Powder onto the clipboard. Video Link.


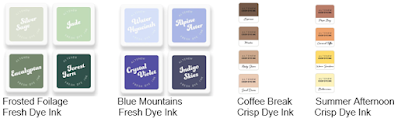
I then trimmed white cardstock to 8 1/2" x 11 1/4" and used the Ink Smooshing Technique with the Altenew Coffee Break Crisp Dye Ink.
Tip: Adding the Dye Ink onto the acetate gives you more control of where to add ink onto the cardstock.
Be sure to check out my Video Tutorial above to learn how to use the Ink Smooshing Technique with the Altenew Coffee Break Crisp Dye Ink. Video Link.

Following on from this I stamped the panel with a script stamp, heat embossed it using the Altenew Pure White Crisp Embossing Powder and distressed the edges.

I then used the Stencil Foil Technique on the panel which was not part of the AECP Celebration Stencil Techniques Course, but I think this technique creates such a wonderful shiny texture and is a new way to step up the challenge.
I used Gesso and foil with the Altenew Buffalo Plaid Builder Stencil and just love the wonderful shiny texture I achieved for my background. Be sure to check out my Video Tutorial above to learn how to use the Stencil Foil Technique. Video Link.
Tip: When working with Gesso, clean your stencils and tools right away. Do not allow it to dry, because it will be very difficult to clean.


Following on from this I cut a strip of cardboard to 5 1/4" x 9 1/2", burlap to 1 3/8" x 7 5/8" and added it onto the panel.

I then created my own stencil and die-cut white cardstock with the Altenew Decorative Enamels Die.
Tip: This technique is such a great way to stretch the use of your die stash. Use thicker cardstock when creating your own stencil so that you can get multiple uses out of it.
Following on from this I cut white cardstock to 4 1/2" x 8 3/4" and used the Ink Blending and Negative Masking Techniques. I ink blend through the Altenew Decorative Enamels die-cut stencil using the Altenew Coffee Break Mocca Crisp Dye Ink and I love the beautiful textured background I achieved. Be sure to check out my Video Tutorial above to learn how to use the Die-cut Stencil Technique, Ink Blending and Negative Masking Techniques. Video Link.

I then stamped the Altenew Tree of Fantasy Tree Stump Stamp onto the ink blend panel with the Altenew Coffee Break Mocca Crisp Dye Ink. Be sure to check out my Video Tutorial above to learn how to use the Altenew Tree of Fantasy Tree Stump Stamp in a totally different way. Video Link.
Tip: Use your stamps in a totally different way for which they were intended to be used. This way you get so much more from your stamp images.


To create a Post Card theme for the panel I stamped other stamps with the Altenew Summer Afternoon Warm Sunshine Crisp Dye Ink and distressed the edges.
Following on from this I used the Ink Blending Technique with the Altenew Blue Mountains Crystal Violet Fresh Dye Ink, die-cut it with the Altenew Decorative Enamels Die and adhered it onto the panel.


I then die-cut white cardstock with number dies, inked it with the Altenew Frosted Foliage Forest Fern Fresh Dye Ink and heat embossed it with clear embossing powder.
Tip: If you do not have the correct embossing powder use Altenew Dye Inks with clear embossing powder to achieve the correct colour combination.


Following on from this I cut blending cardstock to 3 3/4" x 6 3/8", stamped the Altenew Enjoy Your Journey Train Stamp with the Altenew Stampwheel and coloured it with the Altenew Artist Markers Mystic Garden Set J, Rock Garden Set D, Summer Afternoon Set and Warm Grey Set. I love these Artist Markers it just blends perfectly and the end result is a beautiful bright and striking coloured image.
Tip: When colouring with Altenew Artists Markers it is important to use blending cardstock to prevent bleeding.

To finish I stamped the Altenew Enjoy Your Journey Sentiment Stamp, heat embossed it and adhered it onto the panel using 3D foam dots.

Also do not forget to check out my Level 2 Final Challenge 4 Masculine Cards with different themes in Part 1 Blog Post. Herewith the link to: Level 2 Final Challenge 4 Masculine Cards Blog Post.
I will share more of my projects from the AECP as I work my way through the courses so stay tuned for more cardmaking posts!
If you like what you have seen from me, please give a follow over or subscribe to my Blog and Youtube if you have not already:
My Personal blog here:


My YouTube here:
My Facebook here:
https://www.facebook.com/AnetVanZyl/
Thank you for visiting me and I hope you enjoyed how I created my Level 2 Final Challenge Altered Clipboard. This was such a fun and learning experience! I always appreciate you taking the time to leave a lovely comment.
Anet x

I would like to enter the following challenges:
Love To Scrap Challenge Blog. Theme: Anything Goes
Mix It Up Challenge Blog. Theme: Anything Goes
Crafts Galore Challenge Blog. Theme: Anything Goes
Worldwide Crafters and Colorists Challenge Blog. Theme: Anything Goes
Classic Design Challenge Blog. Theme: Anything Goes.
Morgan's ArtWorld Challenge Blog. Theme: Anything Goes.
613 Avenue Create Challenge Blog. Theme: Anything Goes.
The Die-cut Divas Challenge Blog. Theme: Birthday.
The Male Room Challenge Blog. Theme: Travel.
Just in case you want to do a little shopping I have added the links below (they are affiliate links which means that I will receive a small portion of the sale at no extra cost to you). I truly appreciate your support of my card adventures!
Material list:
Affiliate links are used

Other Products:
- Distress Oxide Walnut Stain & Brushed Corduroy
- Distress Embossing Glaze Walnut Stain & Vintage Photo
- Tim Holtz Embossing Dauber
- Finnabair Heavy Gesso
- Cardboard
- Burlap
- Couture Creations Gold Heat Activated Foil
- MFT By The Number Dies
- Notebook Paper Stamp
- Darkroom Door French Script Stamp
- Vintage Postcard Stamp
- Wendy Vecchi Make Art Stay-tion

Wow, what a wonderful project-great techniques! Thanks for joining us at Die Cut Divas!
ReplyDeleteBeautiful card! You incorporated the theme very nicely. Thanks for shering video! Thanks for playing at The Male Room challange.
ReplyDeleteWhat a fantastic travel card :-)) I love it!
ReplyDeleteThank you for joining us at The Male Room ❤️
Very nice work as always!!!
ReplyDeleteI love that train scene. The train is so small - great detail work there. So glad you joined us at Die Cut Divas for the Birthday challenge.
ReplyDeleteAbsolutely Brilliant project!!! SO SO SO good!
ReplyDeleteFabulous male card - Thanks for sharing over at 613 Avenue Create this month, hope to see you in future challenges.
ReplyDeleteElaine DT
KraftiKards (my blog)
613 Avenue Create DT
AAA Birthday DT
Peace on Earth Christmas DT
Simply Clean and Simple DT
Love to Scrap DT
Love to Craft DT
Mix it up DT
Merry Little Christmas DT
A beautiful card, thanks for sharing it with us at Morgan's Artworld Challenge Blog.
ReplyDeleteBig hugs Ilonka DT
A beautiful card, thanks for sharing it with us at Worldwide Crafters and Colorists Challenge Blog.
ReplyDeleteBig hugs Ilonka DT
This seems a wonderful project! Your masculine cards are brilliant, all of them! I love your mixed media work!
ReplyDeleteThank you for joining us at the Crafts Galore Encore Challenge.
~ DT Dagmara
Beautiful trevel card. Thank you for joining us at The Male Rom challenge. Goga DT
ReplyDeleteLove this Anet and your instructions are perfect. Thank you for sharing with us over at Worldwide Crafters and Colorists Challenge.
ReplyDeleteGail DT