Monday, 11 July 2022

Spot & Partial Stencil Technique Cards - Couture Creations

Hi Everyone, Anet here today and welcome to my inspiration post. 

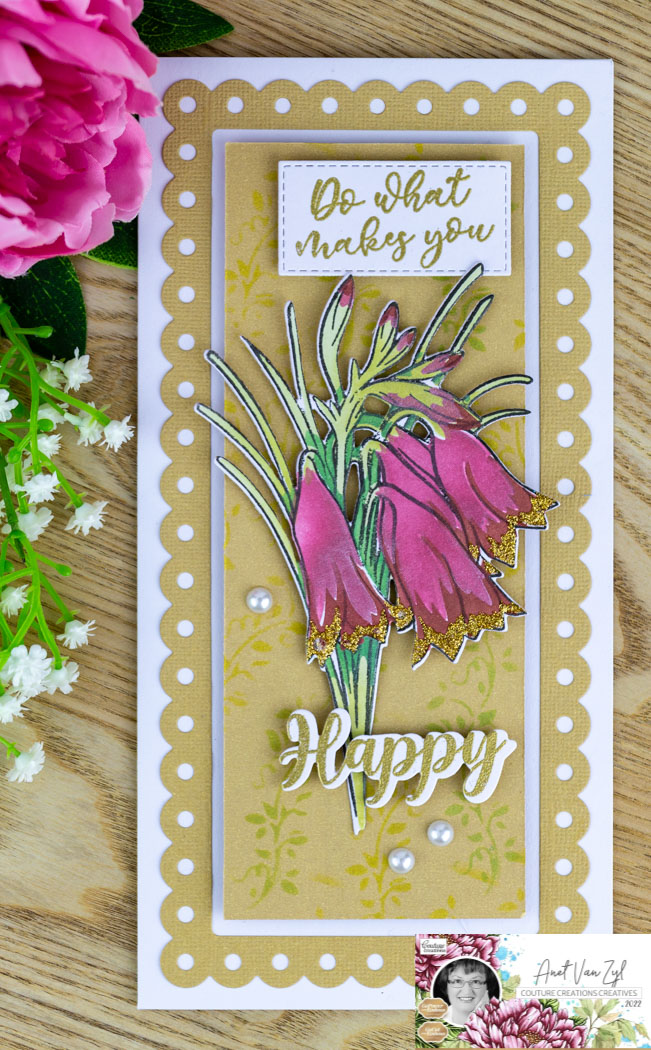
I made two cards showing you how to use the Spot and Partial Stencilling Techniques with the Flourish & Thrive Collection Stencils from Couture Creations. 


Step by Step Instructions:

Spot Stencilling Technique

Follow my video tutorial below to learn how to use the Spot Stencilling Technique with the Flourish & Thrive Waxflowers and Christmas Bells Stencils.


I trimmed Blue Moon Cardstock to 3 1/4" x 5" and adhered it onto the card front.

I then trimmed Smooth White Cardstock to 3" x 4 3/4" and blend the Mid Blue Pigment Ink onto the cardstock using the Blending Brush. 

To create a background I used the Box Leaf Waxflowers and Christmas Bells Stencils with Mid Blue, Leave Green Pigment Ink and the Blending Brush. I layered it onto the card front using 3D foam dots.

I then  heat embossed the Flourish & Thrive Box Leaf Waxflowers Sentiment Stamp onto Blue Moon Cardstock, die-cut it with the Modern Essentials Nesting Oval Frame Die and adhered it onto the card front using 3D foam dots.


I used the Flourish & Thrive Christmas Bells Stencil and Olive Green Pigment Ink onto Smooth White Cardstock. After it dried I die-cut it with the Flourish & Thrive Box Leaf Waxflowers Die.


Partial Stencilling Technique

Follow my video tutorial below to learn how to use the Partial Stencilling Technique with the Flourish & Thrive Box Leaf Waxflowers Stencil.


I first trimmed Driftwood Cardstock to 3 7/8" x 5 1/2" and adhered it onto the card front.

I then trimmed Jungle Cardstock to 3 1/4" x 5" and layered it onto the card front.

I trimmed Smooth White Cardstock to 3" x 4 3/4" and used the Flourish & Thrive Box Leaf Waxflowers Stencil and Olive Green Pigment Ink with the Blending Brush to create a background. I then layered the inked background onto the card front using 3D foam dots.

I stamped the Flourish & Thrive Box Leaf Waxflowers Stamp onto Blending Card using the Colour Outline Ink Pad Soft Black and coloured it with the Twin Tip Alcohol Ink Markers.


Twin Tip Alcohol Ink Markers Combinations:

Waxflowers: 155, 3572, 173, 120, 123, 151, 7565
Leaves: 9544, 2288, 377

I then die-cut the stamped image with the Flourish & Thrive Box Leaf Waxflowers Die and adhere it onto the card front using 3D foam dots.

To finish off my card I heat embossed a sentiment using the Flourish & Thrive Box Leaf Waxflowers Sentiment Stamp and added some Couture Creations Gemstones.


Are you ready to learn how to use the 
Spot and Partial Stencilling Techniques?
Grab a cuppa and just click the video link below.

Video Link:


Couture Creations Material List:

C0726520 GoPower & Emboss Machine
C0727163 GoPower & Emboss Magnetic Platform
C0728701 All-In-One Magnetic Art Work Station
C0727381 Precision Stamp Press
C0728299 Stamp Scrubber
C0728094 Stamp Cleaner
C0728475 Stamp and Colour Outline Ink Pad Soft Black
C0728580 Blending Card
C0APC2 Twin Tip Alcohol Ink Markers
C0727948 Medium Blending Brush
C0728722 Flourish & Thrive Box Leaf Waxflowers Stencil, Stamp & DieCut Set
C0728722 Flourish & Thrive Christmas Bells Stencil, Stamp & DieCut Set
C0726460 Modern Essentials Nesting Inset Oval Frames Cut, Foil and Emboss Die
CDEIPL007 Leave Green Card Deco Essentials Pigment Ink
CDEIPL015 Mid Blue Card Deco Essentials Pigment Ink
DEIPL018 Olive Green Card Deco Essentials Pigment Ink
C0728699 Smooth White Cardstock 280gsm
ULT200014 Ultimate Crafts 12 x 12 Blue Moon Cardstock 250gsm
ULT200038 Ultimate Crafts 12 x 12 Jungle Cardstock 250gsm
ULT200046 Ultimate Crafts 12 x 12 Driftwood Cardstock 250gsm
C0726327 Tacky Glue 
AD90017 Couture Creations Double Sided Tape 12mm
C0724158 Golden Touch Premium Adhesive Gemstones.

Follow me on my personal blog here: 
I would like to enter the following challenges:

Passion For Markers Challenge Blog.  Theme:  Bingo Board (Die Cuts, Image and Sentiment).
Classic Design Challenge Blog.  Theme:  Anything Goes.
Morgans Artworld Challenge Blog.  Theme:  Anything Goes.
Crafts Galore Encore Challenge Blog.  Theme:  Anything Goes.
Crafty Friends Challenge Blog.  Theme:  Embossing Wet/Dry.
Love To Craft Challenge Blog.  Theme:  Anything Goes.
613 Avenue Create Challenge Blog.  Theme:  Anything Goes.
Mix It Up Challenge Blog.  Theme:  Anything Goes.
The Corrosive Challenge Blog.  Theme:  Anything Goes.

Thank you for visiting today and I hope you enjoyed how I created my Spot and Partial Stencilling Techniques Cards.  
Happy Crafting!

Anet

Friday, 1 July 2022

Daffodil Gift Bag - Couture Creations

Hi Everyone, Anet here today and welcome to my inspiration post. 

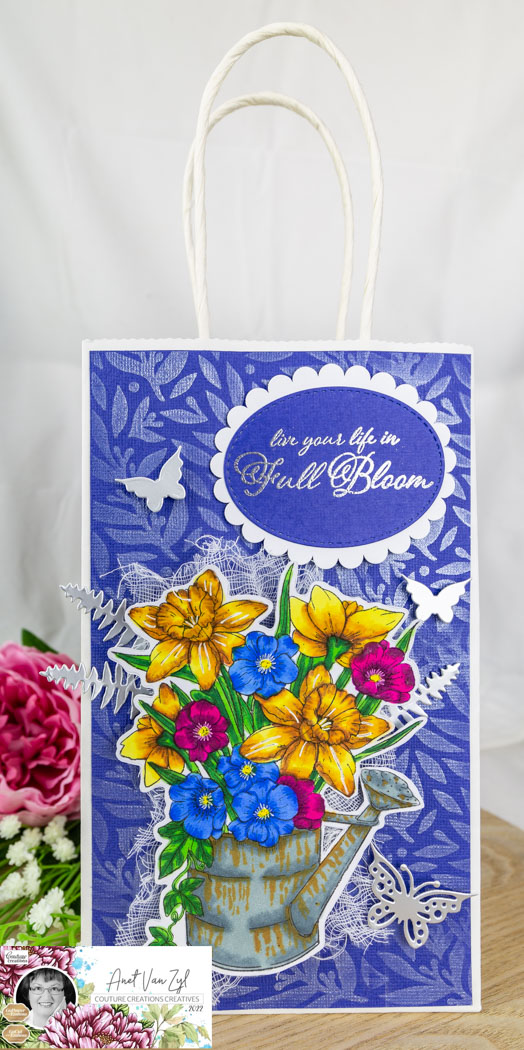
I made a Gift Bag using the Vintage Blooms and Flourish & Thrive Collections from Couture Creations.


Step by Step Instructions:

I first trimmed Mystique Cardstock to 4 7/8" x 8 3/8".

I then used the Flourish & Thrive Box Leaf Waxflowers Stencil, Blending Brush and Platinum White Pigment Ink on the Mystique Cardstock. To prevent the cardstock of moving I used the All-In-One Magnetic Art Work Station.


I then stamped the Vintage Blooms Daffodils Stamp onto Blending Card using the Colour Outline Ink Pad Soft Black and coloured it with the Twin Tip Alcohol Ink Markers.


Twin Tip Alcohol Ink Markers Combinations:

Watering Can: 545, 535, 7510
Leaves: 9544, 2288, 377
Daffodils: 120, 123, 151, 479
Pansies: 106, 234, 216, 232, 659, 2727, 2925 and White Gel Pen

I fussy-cut the stamped image with the Couture Creations Small General Purpose Scissor and adhere it onto the gift bag using 3D foam dots.

I then die-cut Silver Mirror Board with the Homely Florals Love and Smile Butterfly and Leave Dies and adhere it onto the gift bag using 3D foam dots.


I stamped the Flourish & Thrive Christmas Bells Sentiment Stamp onto Mystique Cardstock and heat embossed it. 

I then die-cut it with the Scalloped Oval Die and adhere it onto the gift bag using 3D foam dots to finish.


Couture Creations Material List:

C0726520 GoPower & Emboss Machine
C0727163 GoPower & Emboss Magnetic Platform
C0728701 All-In-One Magnetic Art Work Station
C0727948 Medium Blending Brush
C0728523 Small General Purpose Scissors
C0727381 Precision Stamp Press
C0728299 Stamp Scrubber
C0728094 Stamp Cleaner
C0728475 Stamp and Colour Outline Ink Pad Soft Black
C0728580 Blending Card
C0APC2 Twin Tip Alcohol Ink Markers
C0728722 Flourish & Thrive Box Leaf Waxflowers Stencil, Stamp & DieCut Set
C0728722 Flourish & Thrive Christmas Bells Stencil, Stamp & DieCut Set
C0728666 Homely Florals Love Sentiment Die Set
C0728660 Homely Florals Smile Sentiment Die Set
C0728576 Vintage Blooms Daffodils Stamp
C0723041 Scalloped Oval Die Set
ULT200011 Ultimate Crafts 12 x 12 Mystique Cardstock 250gsm
CDEIPL027 Platinum White Card Deco Essentials Pigment Ink
C0725409 Mirror Board Matte Silver
C0726327 Tacky Glue 
AD90017 Couture Creations Double Sided Tape 12mm

Follow me on my personal blog here: 
I would like to enter the following challenges:

Classic Design Challenge Blog.  Theme:  Anything Goes.
Morgans Artworld Challenge Blog.  Theme:  Anything Goes.
Crafts Galore Encore Challenge Blog.  Theme:  Anything Goes.
Crafty Friends Challenge Blog.  Theme:  Embossing Wet/Dry.
Love To Craft Challenge Blog.  Theme:  Anything Goes.
Love To Scrap Challenge Blog.  Theme:  Anything Goes.
Mix It Up Challenge Blog.  Theme:  Anything Goes.
Just Add Ink Challenge Blog.  Theme:  Inspiration (Colours Yellow, Blue, Green and Red).

Thank you for visiting today and I hope you enjoyed how I created my Daffodil Gift Bag.
  
Happy Crafting!

Anet


Wednesday, 29 June 2022

The Mermaid And The Treasure - The Paper Shelter

Hi Everyone, are you ready ...

It is time for a new challenge at Paper Shelter
and the theme is Under The Sea

Now here is my tag
using The Mermaid And The Treasure
Coloured with Copic Sketch Markers.


Sentiment: LOTV Sentiment Tag Stamp. Dies: Marianne Design Sea Shells. MFT Sea Charms. Couture Creations Seaside & Me Branching Coral Seaside.

Our Sponsor The Paper Shelter are offering one lucky winner a fabulous gift certificate of $30. But, you must use a Paper Shelter product on your card or project. This could be a Paper Shelter Image, Paper or Printable. If you don't use a Paper Shelter product, you could still win 3 digi images of your own choice. So it really is a win win situation don't you think.


Make sure you go over to The Paper Shelter Shop and take a look at all the beautiful digital stamps.


I would like to enter the following challenges:

Crafty Gals Corner Challenge Blog.  Theme:  Anything Goes.
World Wide Open Design Team Challenge Blog.  Theme:  Anything Goes.
Make My Monday Challenge Blog.  Theme:  Colouring Any Medium.
Double D Challenge Blog.  Theme:  Beach Time.
Fab 'n Funky Challenge Blog.  Theme:  Summer Colours.
Creative Fingers Challenge Blog.  Theme:  Anything Goes.
Passion For Markers Challenge Blog.  Theme:  Any Occasion Other Than Birthday.

Thank you for visiting me, I always appreciate you taking the time to leave a lovely comment.


Anet x

Wednesday, 15 June 2022

Here We Go - The Paper Shelter

Hi Everyone, are you ready ...

It is time for a new challenge at Paper Shelter
and the theme is Favourite Colours

Now here is my card 
using Here We Go
Coloured with Copic Sketch Markers.


Sentiment: LOTV Christmas Sentiment Tag Stamp. Dies: Marianne Design Mini Poinsettias. Couture Creations Deck The Halls Happy Holidays Tall Card Set, Rustic Christmas Tree and Holly Centrepiece. Rangers Stickles.

Our Sponsor The Paper Shelter are offering one lucky winner a fabulous gift certificate of $30. But, you must use a Paper Shelter product on your card or project. This could be a Paper Shelter Image, Paper or Printable. If you don't use a Paper Shelter product, you could still win 3 digi images of your own choice. So it really is a win win situation don't you think.


Make sure you go over to The Paper Shelter Shop and take a look at all the beautiful digital stamps.


I would like to enter the following challenges:

The 12 Months of Christmas Link Up Challenge Blog.  Theme:  Anything Goes.
Christmas With The Cuties Challenge Blog.  Theme:  Anything Goes (Cute, Red and White).
Pearly Sparkles Challenge Blog.  Theme: One For The Boys.
Do All Creative Challenge Blog.  Theme:  Group (3 Gem Stones).
Crafty Animals Challenge Blog.  Theme:  Anything Goes.
Classic Design Challenge Blog.  Theme:  Anything Goes.
Crafty Critter Crazies Challenge Blog.  Theme:  Anything Goes.
Morgan's Artworld Challenge Blog.  Theme:  Anything Goes.
Dream Valley Challenge Blog.  Theme:  Add a Sentiment.

Thank you for visiting me, I always appreciate you taking the time to leave a lovely comment.


Anet x

Christmas Bells Cards - Couture Creations

Hi Everyone, Anet here today and welcome to my inspiration post. 

I made two cards and a video showing you how to add texture to stencilled flowers. I used the Flourish & Thrive Christmas Bells Stencil, Stamp & DieCut Collection from Couture Creations.


Step by Step Instructions:

My video tutorial below will show you how to add texture to stencilled flowers.

Are you ready to learn how to add Texture to Stencilled Flowers
Grab a cuppa and just click the video link.

Video Link:


Card 1 - Glitter Texture


I first die-cut the Paper Bag Cardstock with the Deck The Halls Happy Holidays Tall Die Set and adhere it onto a White Tall Card.

To create a background I inked the Paper Bag Cardstock with the Christmas Bells Stencil and Gold Pigment Ink.


I stamped the Christmas Bells Sentiments onto Smooth White Cardstock and heat emboss it. I then die-cut the Christmas Bells Happy Sentiment and adhered the sentiments onto the card front using 3D foam dots.

Follow my video above where I show you how to colour the leaves and flowers of the Christmas Bells Stamp. I used Smooth White Cardstock and the Stamp and Colour Outline Ink Pad Black to stamp the imageVideo Link.

To colour the leaves and flowers I used the Blending Brushes with Olive Green, Christmas Green, Burgundy and Eggplant Pigment Ink.

To add texture I used a pallet knife and added Glitzin Glamour Aztec Gold onto the Christmas Bells Stencil. Follow my video tutorial above where I show you how to add texture to stencilled flowers. Video Link.

To finish I die-cut the Christmas Bells Image using the Christmas Bells Die and added it to the card front using 3D foam dots.

Card 2 - Embossing Texture


I first trimmed Blue Moon Cardstock to 3 7/8" x 5" and layered onto the card front.

I then trimmed Smooth White Cardstock to 3 3/8" x 5 1/8". 

To create a background I inked the Smooth White Cardstock with the Christmas Bells Dotted Stencil and Pale Brown Dye Ink.


Follow my video above where I show you how to colour the leaves and flowers of the Christmas Bells Stamp. I used Smooth White Cardstock and the Stamp and Colour Outline Ink Pad Black to stamp the imageVideo Link.

To colour the leaves and flowers I used the Blending Brushes with Leave Green, Apple Green and Mid Blue Pigment Ink as well as Light Blue Dye Ink.

To add texture I used a pallet knife and added Gesso mixed with Ink onto the Christmas Bells Stencil. Follow my video tutorial above where I show you how to add texture to stencilled flowers. Video Link.

I stamped the Christmas Bells Sentiment onto Smooth White Cardstock, heat emboss it and adhered it onto the card front using 3D foam dots.

To finish I die-cut the Christmas Bells Image using the Christmas Bells Die and added it to the card front using 3D foam dots.

Couture Creations Material List:

C0726520 GoPower & Emboss Machine
C0727163 GoPower & Emboss Magnetic Platform
C0728701 All-In-One Magnetic Art Work Station
C0727860 Glass Mat
C0727381 Precision Stamp Press
C0728299 Stamp Scrubber
C0728094 Stamp Cleaner
C0728475 Stamp and Colour Outline Ink Pad Soft Black
C0727947 Large Blending Brush
C0727948 Medium Blending Brush
C0728722 Flourish & Thrive Christmas Bells Stencil, Stamp & DieCut Set
C0728532 Deck The Halls Happy Holidays Tall Card Nesting Die Set
C0728699 Smooth White Cardstock 280gsm
ULT200014 Ultimate Crafts 12 x 12 Blue Moon Cardstock 250gsm
ULT200045 Ultimate Crafts 12 x 12 Paper Bag Cardstock 250gsm
C0724847 White Tall Card & Envelope Set
CDEIPL007 Leave Green Card Deco Essentials Pigment Ink
CDEIPL015 Mid Blue Card Deco Essentials Pigment Ink
CDEIPL017 Apple Green Card Deco Essentials Pigment Ink
DEIPL018 Olive Green Card Deco Essentials Pigment Ink
DEIPL021 Burgundy Card Deco Essentials Pigment Ink
DEIPL023 Christmas Green Card Deco Essentials Pigment Ink
DEIPL026 Gold Card Deco Essentials Pigment Ink
DEIPL032 Eggplant Card Deco Essentials Pigment Ink
CDEIPU018 Light Blue Card Deco Essentials Dye Ink
CDEIPU033 Pale Brown Card Deco Essentials Dye Ink
C0721981 Glitzin Glamour Aztec Gold

Follow me on my personal blog here: 
I like to enter the following challenges:

Morgan's Artworld Challenge Blog.  Theme:  Anything Goes.
Crafts Galore Encore Challenge Blog.  Theme:  Anything Goes.
Do All Creative Challenge Blog.  Theme:  Group (3 Gem Stones).
Classic Design Challenge Blog.  Theme:  Anything Goes.
Alphabet Challenge Blog.  Theme:  E is for Embossing Wet or Dry.
Crafty Gals Corner Challenge Blog.  Theme:  Anything Goes.
Through The Purple Haze Challenge Blog.  Theme:  Anything But Square.
Dream Valley Challenge Blog.  Theme:  Add a Sentiment.

Thank you for visiting today and I hope you enjoyed my Textured Stencilled Flower Cards. 
 
Happy Crafting!

Anet


Friday, 3 June 2022

Sunflower Envelope Box Card - Couture Creations

Hi Everyone, Anet here today and welcome to my inspiration post. 

I made an Envelope Box Card using the Vintage Blooms Collection Stamp and coloured it with the Couture Creations Twin Tip Alcohol Ink Markers.


I found the inspiration from Sam's Blog.

Step by Step Instructions:

My video tutorial below will show you how to create the fabulous Envelope Box Card and you find all the measurements in the video.


I trimmed White Smooth Cardstock to 8 1/4" x 8 3/4", score and fold the cardstock to create the card base.

To decorate the envelope box on the inside and outside I trimmed white cardstock to 4 1/4" x 8" and 4 1/4" x 4 1/4".  I used oxide ink to create the background and after it dried I stamped it randomly with the Vintage Blooms Sunflowers Stamp Set using the Colour Outline Ink Pad Soft Black.


I then stamped the Vintage Blooms Sunflowers Stamp onto Blending Card using the Colour Outline Ink Pad Soft Black and coloured it with the Twin Tip Alcohol Ink Markers. 

Twin Tip Alcohol Ink Markers Combinations:

Sunflower: 120, 123, 151, 7565, 2321
Leaves: 9544, 358, 350
Butterfly: 279, 2727, 286, 319, 323, 327, 2213 White Gel Pen
Blue Flower: 279, 2727, 286, 2283, 358 White Gel Pen
Orange Flower: 155, 3572, 173


I fussy-cut the stamped image with the Couture Creations Small General Purpose Scissor and adhere it onto the Envelope Box Card using 3D foam dots.

I then die-cut white cardstock and Mirror Board Matte Gold Lines with the Lavender Love Garden Frame, Homely Florals Happy Sentiment, Le Petit Jardin Morning Flourish Decorative and Peaceful Peonies Tall Branches Dies to finish.


Are you ready to learn how to create the Envelope Box Card?
Grab a cuppa and just click the video link below.

Video Link:
Couture Creations Material List:

C0726520 GoPower & Emboss Machine
C0727163 GoPower & Emboss Magnetic Platform
C0726342 Scoring Board 12 x 12
C0727860 Glass Mat
C0728523 Small General Purpose Scissors
C0727381 Precision Stamp Press
C0728299 Stamp Scrubber
C0728094 Stamp Cleaner
C0728475 Stamp and Colour Outline Ink Pad Soft Black
C0728580 Blending Card
C0APC2 Twin Tip Alcohol Ink Markers
C0728699 Smooth Cardstock 280gsm
C0725407 Mirror Board Matte Gold Lines Cardstock
C0728578 Vintage Blooms Sunflowers Stamp Set
C0728749 Lavender Love Garden Frame Die Set
C0728662 Homely Florals Happy Sentiment Die Set
C0725942 Le Petit Jardin Morning Flourish Decorative Die
C0727392 Peaceful Peonies Tall Branches Die
C0728515 Turbo Tacky Glue 
C0726325 All Purpose Art Glue 

Follow me on my personal blog here: 
I would like to enter the following challenges:

Creative Fingers Challenge Blog.  Theme:  Anything Goes.
Dream Valley Challenge Blog.  Theme:  Summer Colours.
Passion For Markers Challenge Blog.  Theme:  3 or More Layers.
Crafts Galore Encore Challenge Blog.  Theme:  Anything Goes.
Crafty Animals Challenge Blog.  Theme:  Anything Goes.
Classic Design Challenge Blog.  Theme:  Anything Goes.
Morgan's Artworld Challenge Blog.  Theme:  Anything Goes.
Mix It Up Challenge Blog.  Theme:  Anything Goes/3-D Project.

Thank you for visiting today and I hope you enjoyed how I created my Envelope Box Card.  

Happy Crafting!

Anet

Wednesday, 1 June 2022

Camariere! - The Paper Shelter

Hi Everyone, are you ready ...

It is time for a new challenge at Paper Shelter
and the theme is Inspired By A Movie (Ratatouille)

Now here is my card 
using Camariere!
Coloured with Copic Sketch Markers.


Sentiment: LOTV Sentiment Tag Stamp. Dies: Couture Creations: Gentleman's Emporium Tophat Essentials, Thin Gentleman's Corner, Filigree Bow Tie and Gentleman's Timepiece.

Our Sponsor The Paper Shelter are offering one lucky winner a fabulous gift certificate of $30. But, you must use a Paper Shelter product on your card or project. This could be a Paper Shelter Image, Paper or Printable. If you don't use a Paper Shelter product, you could still win 3 digi images of your own choice. So it really is a win win situation don't you think.


Make sure you go over to The Paper Shelter Shop and take a look at all the beautiful digital stamps.


I would like to enter the following challenges:

World Wide Open Design Team Challenge Blog.  Theme:  Anything Goes.
Passion For Markers Challenge Blog.  Theme:  3 or More Layers.
Fab 'n Funky Challenge Blog.  Theme:  Anything But Square.
Pearly Sparkles Challenge Blog.  Theme: One For The Boys.
Digi Choosday Challenge Blog.  Theme:  Anything Goes.
Crafty Friends Challenge Blog.  Theme:  Men and/or Boys.
Do All Creative Challenge Blog.  Theme:  Group (3 Gem Stones).
Crafter's Cafe Challenge Blog. Theme:  Spots and/or Stripes.
Love To Craft Challenge Blog.  Theme:  Anything Goes.

Thank you for visiting me, I always appreciate you taking the time to leave a lovely comment.


Anet x
Related Posts Plugin for WordPress, Blogger...