Hi Everyone, Anet here today and welcome to my inspiration post.
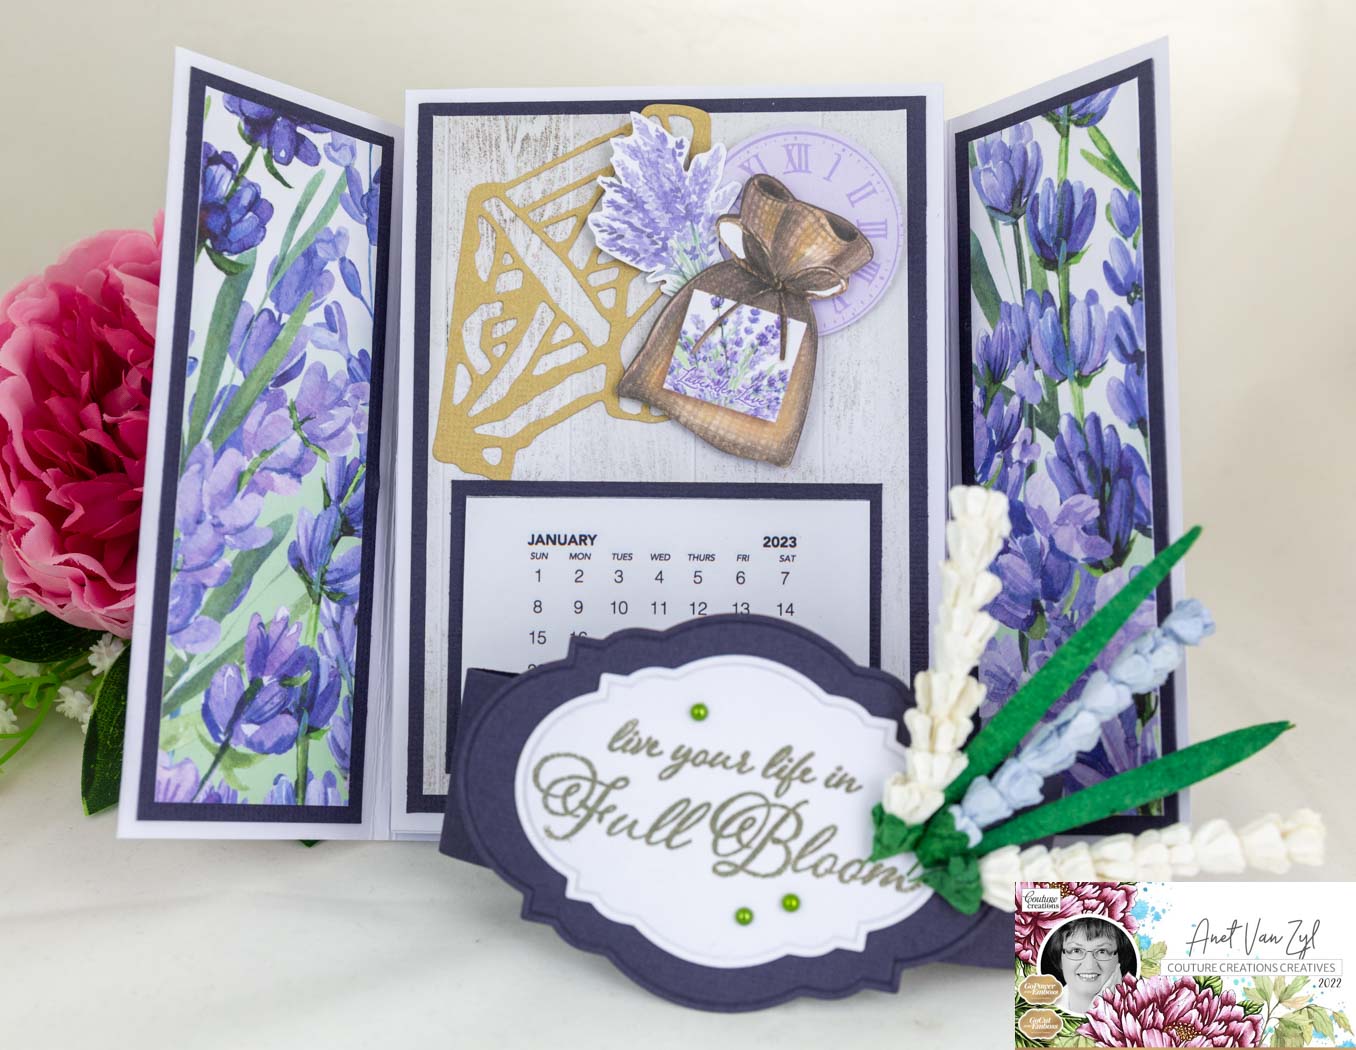
I made a Gatefold Easel Calendar Card with the Lavender Love Collection from Couture Creations.


I found the inspiration from Susan's Blog. I did not follow all her steps, instead I made some changes and put my spin on it.
Step by Step Instructions:
My video tutorial below will show you how to create the fabulous Gatefold Easel Card & Calendar and you will also find all the measurements.
I trimmed Smooth White Cardstock, score and fold the cardstock to create the card base.
I cut Navy Cardstock, Lavender Love Patterned Paper 3 and 4 layered it onto each other and adhered it onto the card base.

I then cut Navy Cardstock to 2 1/8" x 3 1/8" layered the Calendar Tab 2023 onto the cardstock and adhered onto the card base.
I also die-cut Paper Bag Cardstock with the Lavender Love Weathered Fences Die and adhered it onto the card base. Following from this I also added Lavender Love Ephemera.

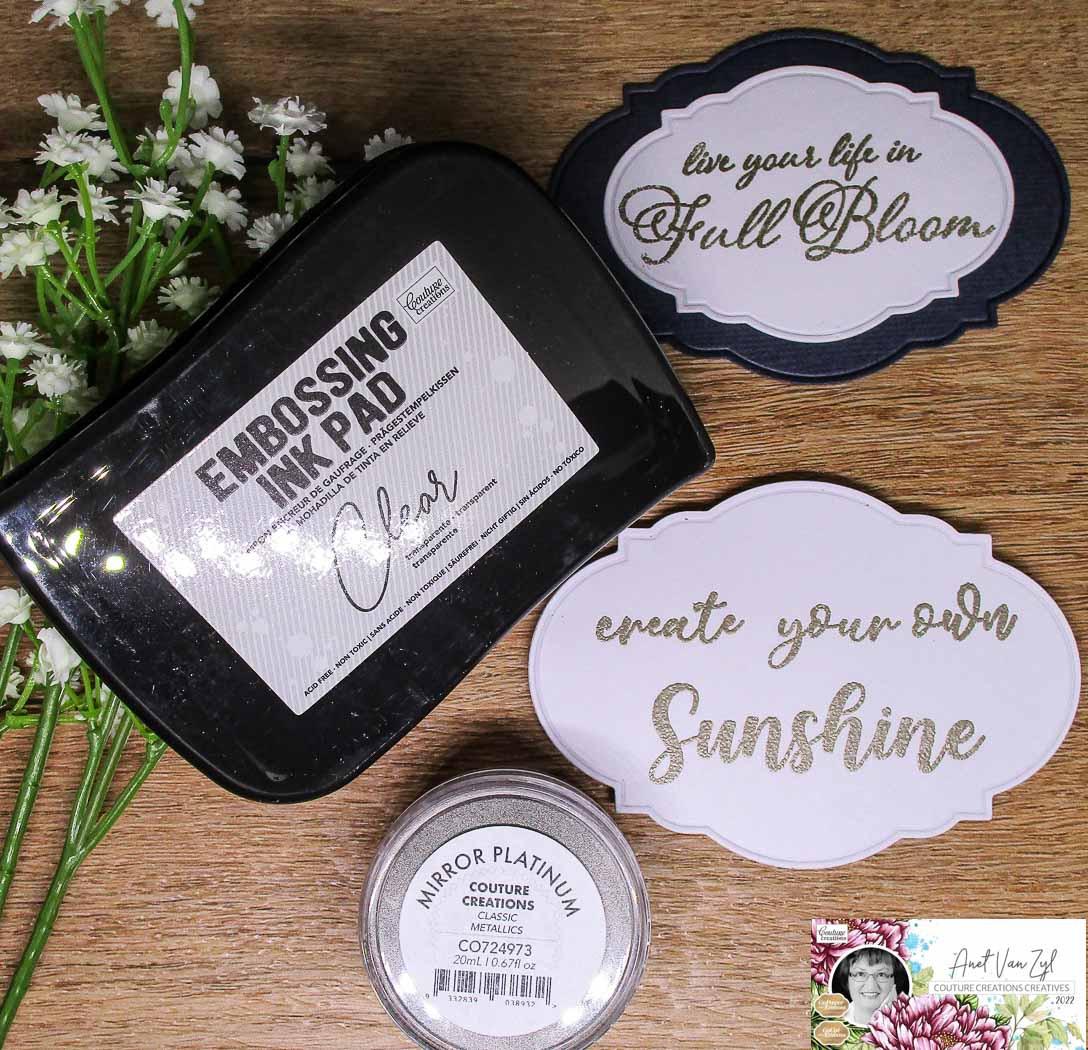
For the stopper of the easel card I die-cut Smooth White Cardstock with the Modern Essentials Nesting Inset Oval Frame Cut, Foil and Emboss Die. Follow my video tutorial below to learn how to add this feature.
I stamped the Flourish & Thrive Box Christmas Bells Sentiment Stamp onto the smooth white cardstock die-cut using the Embossing Ink Pad, Mirror Platinum Classic Metallics Embossing Powder and heat embossing it. I then added Emerald Green Adhesive Pearls and adhered it onto the card base.

Belly Band
I trimmed Navy Cardstock to 1 1/4" x 10" and decorated it with stamping the Flourish & Thrive Box Leaf Waxflowers Sentiment Stamp onto the smooth white cardstock die-cut using the Embossing Ink Pad, Mirror Platinum Classic Metallics Embossing Powder and heat embossing it.
I then added Emerald Green Adhesive Pearls, Green Mulberry Paper Long Grass, Baby Blue and White Lavender Stems and adhered it onto the belly band to finish.


Are you ready to learn how to create the Gatefold Easel Card? Grab a cuppa and just click the video link below.
Couture Creations Material List:
C0726520 GoPower & Emboss Machine
C0727163 GoPower & Emboss Magnetic Platform
C0727860 Glass Mat
C0728737 Lavender Love Collection Kit Patterned Paper 3
C0728739 Lavender Love 6.5 x 6.5 Patterned Paper 4
C0728750 Lavender Love Weathered Fences Cutting Die Set
C0728722 Flourish & Thrive Box Leaf Waxflowers Stencil, Stamp & DieCut Set
C0728722 Flourish & Thrive Christmas Bells Stencil, Stamp & DieCut Set
C0728699 Smooth White Cardstock 280gsm
ULT200088 Ultimate Crafts 12 x 12 Navy Cardstock
ULT200045 Ultimate Crafts 12 x 12 Paper Bag Cardstock 250gsm
C0728766 Calendar Tabs 2023
C0728278 Embossing Ink Pad
C0724973 Mirror Platinum Classic Metallics Embossing Powder
C0724642 Emerald Green Adhesive Pearls
C0728759 White Paper Lavender Stems
C0728761 Baby Blue Paper Lavender Stems
C0728763 Green Mulberry Paper Long Grass
C0726327 Tacky Glue
C0726325 All Purpose Art Glue
C0728524 Tabletop General Scissor Stainless Steel Blade
AD90017 Couture Creations Double Sided Tape 12mm
Retired Materials:
C0726460 Modern Essentials Nesting Inset Oval Frames Cut, Foil and Emboss Die
Follow me on my personal blog here:
@anetscrafting.blogspot.com
Follow me on my YouTube here:
youtube.com/@anetscrafting
I would like to enter the following challenges:
Die Cut Divas Challenge Blog. Theme: Anything Goes.
Crafts Galore Encore Challenge Blog. Theme: Anything Goes.
Classic Design Challenge Blog. Theme: Anything Goes.
Morgan's ArtWorld Challenge Blog. Theme: Anything Goes.
Love To Craft Challenge Blog. Theme: Anything Goes.
Love To Scrap Challenge Blog. Theme: Anything Goes.
Mixed It Up Challenge Blog. Theme: Open Technique (Heat Embossing).
Creative Inspirations Challenge Blog. Theme: Sparkle, Sparkle, Sparkle.
Creative Fingers Challenge Blog. Theme: Anything Goes.
613 Avenue Create Challenge Blog. Theme: Fancy Fold and Cuts.
Thank you for visiting today and I hope you enjoyed how I created my Gatefold Easel Calendar Card.


